Navigation

As a Scout or Guide, you spend a lot of time outdoors. You can use various tools to find your way.
Maps
A map is a simplified representation of your surroundings. It never shows everything. Maps can summarise or simplify information, but they can also give you additional information. Different maps emphasise different features, so different activities call for different maps.
Types of map
What a map looks like depends on its purpose. For example, a globe and a digital world map show the same content in completely different ways. In Scouting and Guiding, we often use printed maps to find our way outdoors. Maps from the Federal Office of Topography (swisstopo) are particularly suitable. Swisstopo produces maps of Switzerland at various scales and for different uses. You can also find digital maps at map.geo.admin.ch or in the swisstopo app.
Map scale
| Scale | 1:25 000 | 1:50 000 | 1:100 000 |
|---|---|---|---|
| Use | Walking | Cycling | Driving |
| Colour | Brown | Green | Red |
| 1 cm on the map represents | 250 m | 500 m | 1000 m |
| 1 km on the ground measures on the map | 4 cm | 2 cm | 1 cm |
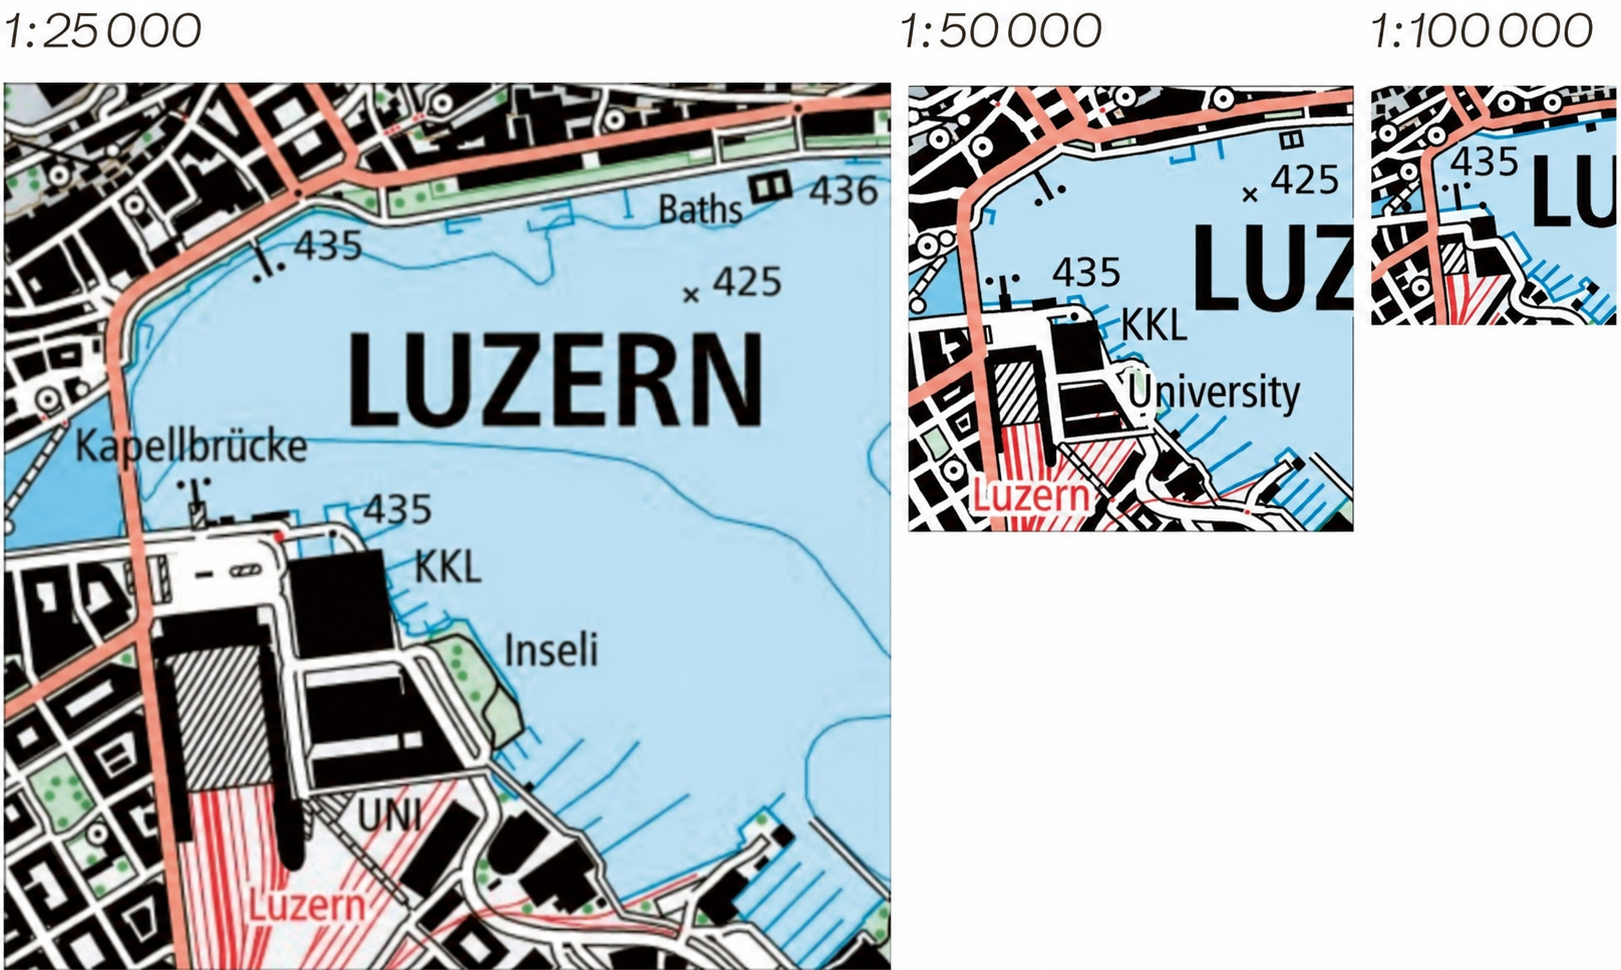 Examples of map scales.
The scale tells you how much the map reduces real distances. At a scale of 1:25 000, one centimetre on the map represents 25 000 cm, or 250 m, on the ground. The easiest way to measure a route on a map is with a thread, a piece of string or a strip of paper. Follow the route with it, then measure its length.
Topographic maps
The appearance of a map also depends on what it is used for. In Scouting and Guiding, we use topographic maps for navigation. They show recognisable details and landforms.
Thematic maps
Thematic maps can show information that you cannot see on the ground, such as national borders, natural hazards or wildlife habitats.
 Earthquake zones (left), wildlife corridors (centre), population density (right).
Parts of a map
Mapmakers use symbols, contour lines, coordinates and many other features to add information about an area.
Map symbols
Map symbols are the signs, symbols and lettering used to represent information about an area. They are designed to be simple and easy to recognise. For example, a single tree is shown as a small green circle, a forest as a green area, a stream as a blue line, a lake as a blue area and a campsite as a small tent symbol. Text provides the names of settlements and prominent features such as lakes and mountains, as well as other information.
The following illustrations show the symbols used on common swisstopo maps.
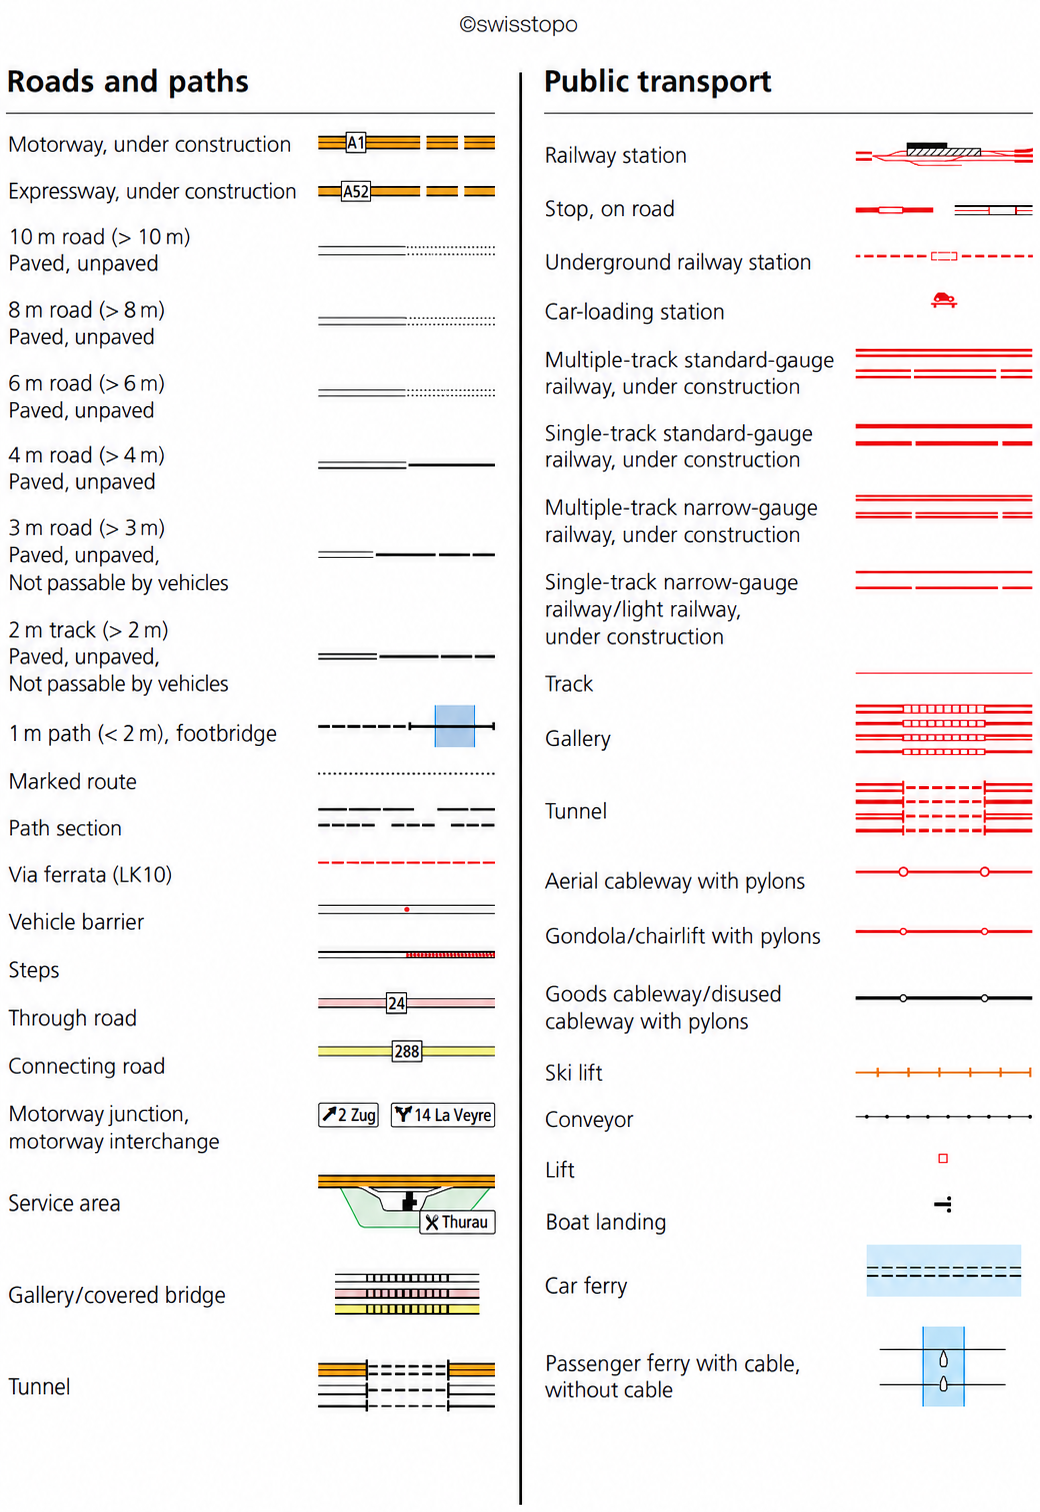 Swisstopo map symbols, sheet 1.
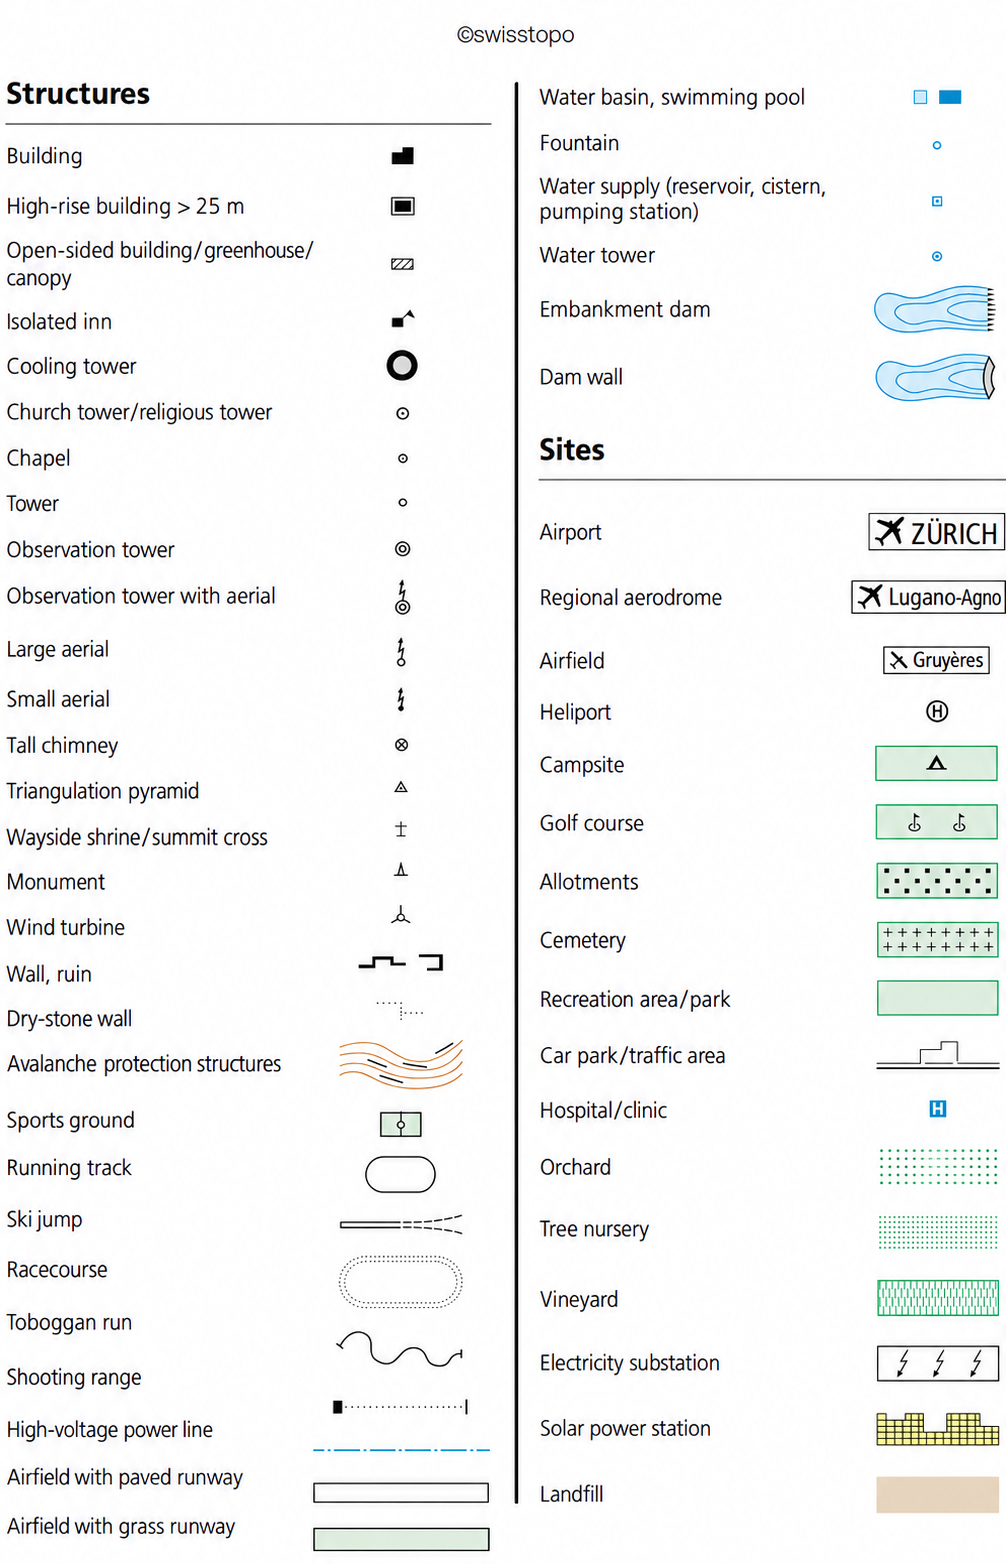 Swisstopo map symbols, sheet 2.
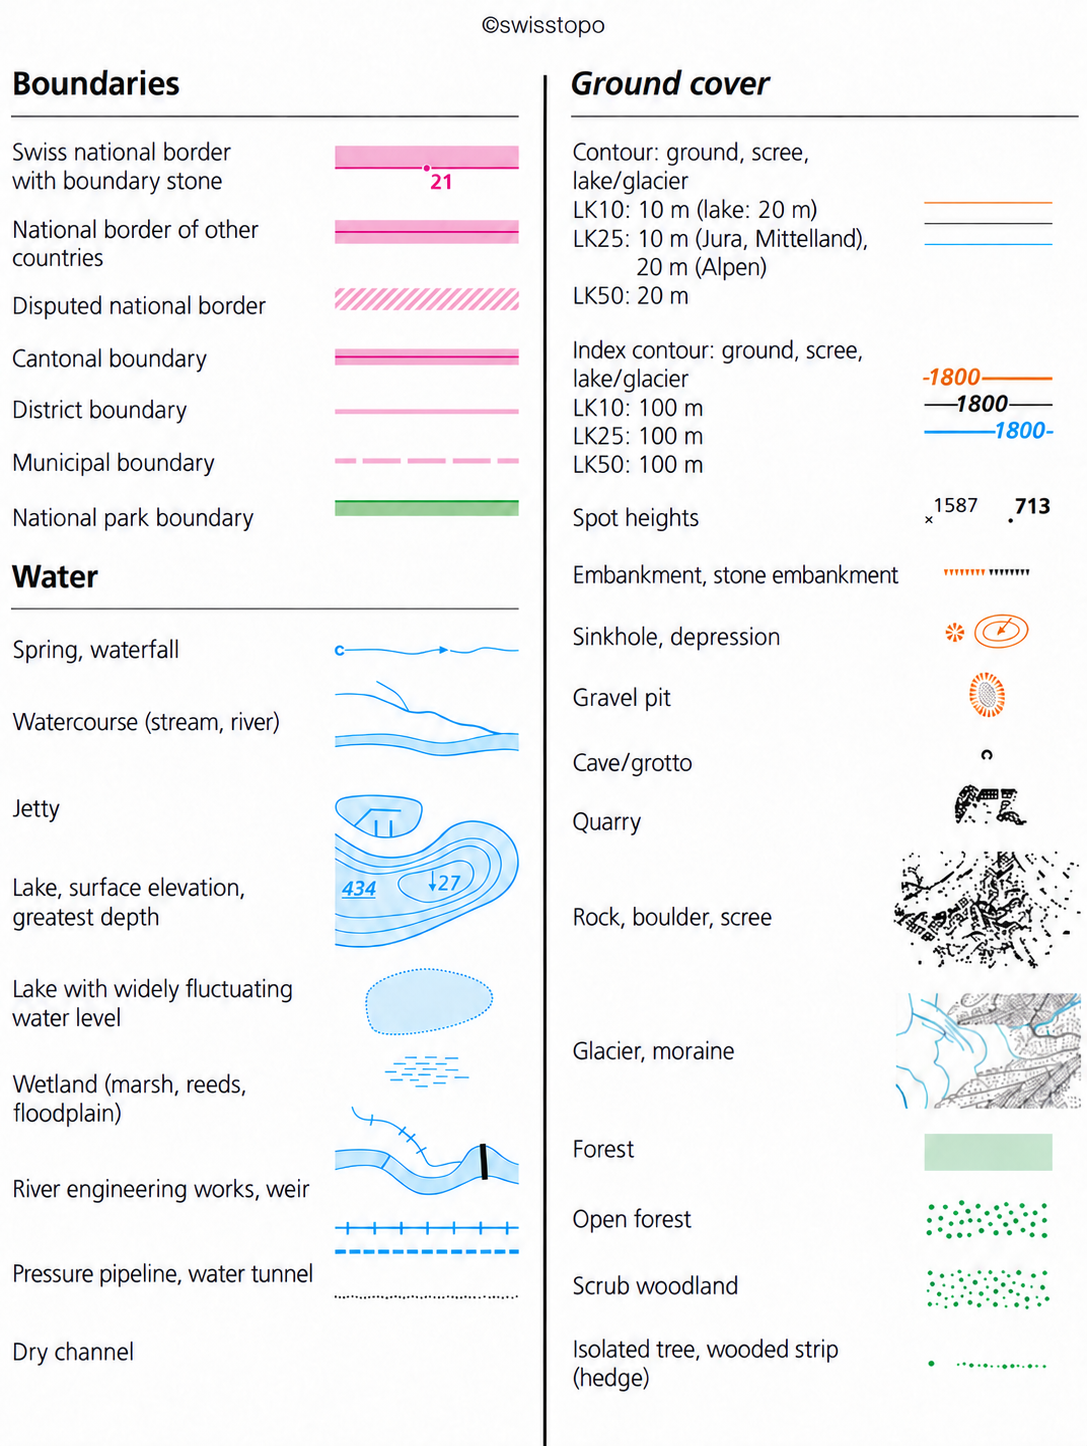 Swisstopo map symbols, sheet 3.
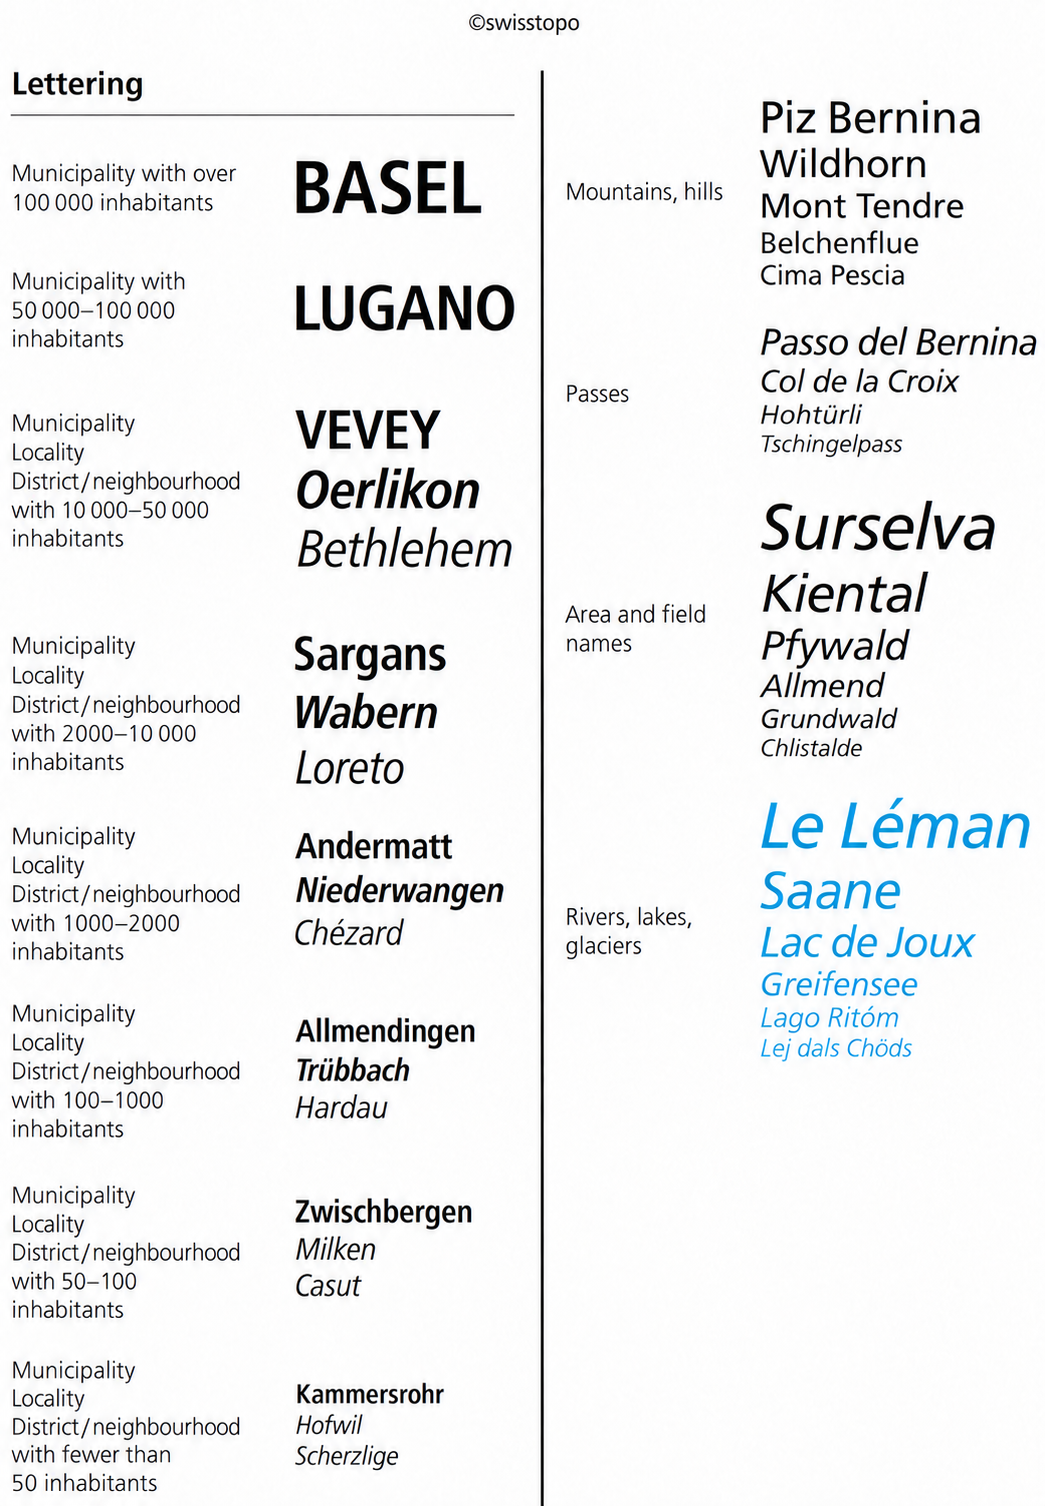 Swisstopo map symbols, sheet 4.
Coordinates
A coordinate reference identifies a particular point on the map. It consists of two numbers: the easting and the northing. In Switzerland, eastings increase from west to east, or from left to right on the map. Northings increase from south to north, or from bottom to top. Coordinate units depend on the map. Global geographical coordinates, for example, are given in degrees (°).
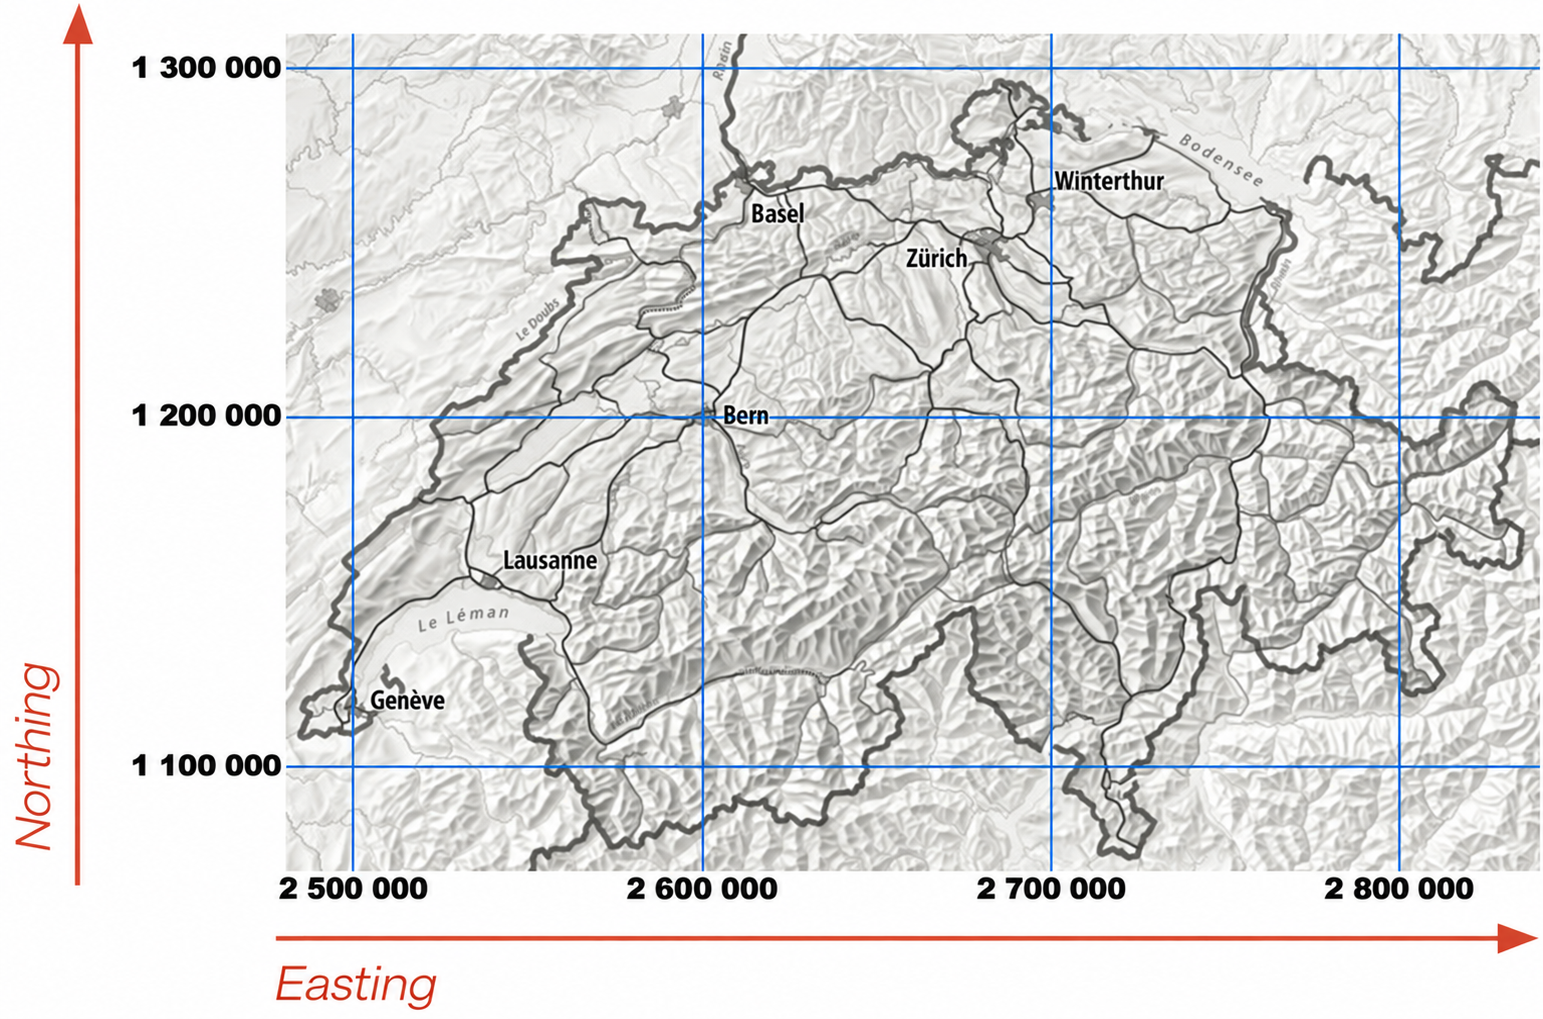 The Swiss coordinate grid.
The Swiss coordinate grid is measured in metres. Its reference point is the old observatory in Bern, with coordinates 2 600 000 east and 1 200 000 north. When writing coordinates, separate the easting and northing with a slash: 2 600 000 / 1 200 000. Coordinates identify any point in Switzerland unambiguously, even if you accidentally reverse the two numbers: the easting always begins with 2 (2 XXX XXX), and the northing with 1 (1 XXX XXX). Swiss eastings range from approximately 2 500 000 to 2 850 000, and northings from 1 100 000 to 1 300 000. Coordinates are usually printed around the map's edges. This system makes a coordinate reference quick and easy to interpret. Take 2 665 821 / 1 209 923, for example. Without finding the point on the map, you can work out how far it is from the observatory in Bern:
- 2 665 821 − 2 600 000 = 65 821 m
- 1 209 923 − 1 200 000 = 9923 m
The point is therefore 65 821 m, or 65.821 km, east and 9923 m, or 9.923 km, north of the observatory. You can calculate the east–west and north–south separations between any two coordinate references in the same way.
Contour lines
Contour lines, or isohypses, connect points at the same height above sea level. Their colour varies with the terrain, and they are labelled in metres. On 1:25 000 maps, the vertical interval between two contour lines is 20 m in the Alps and 10 m on the Mittelland and in the Jura. The contour interval is stated on each map, usually along the bottom edge. Contour lines help you draw cross-sections and calculate gradients for a walk.
 Contour lines on a map.
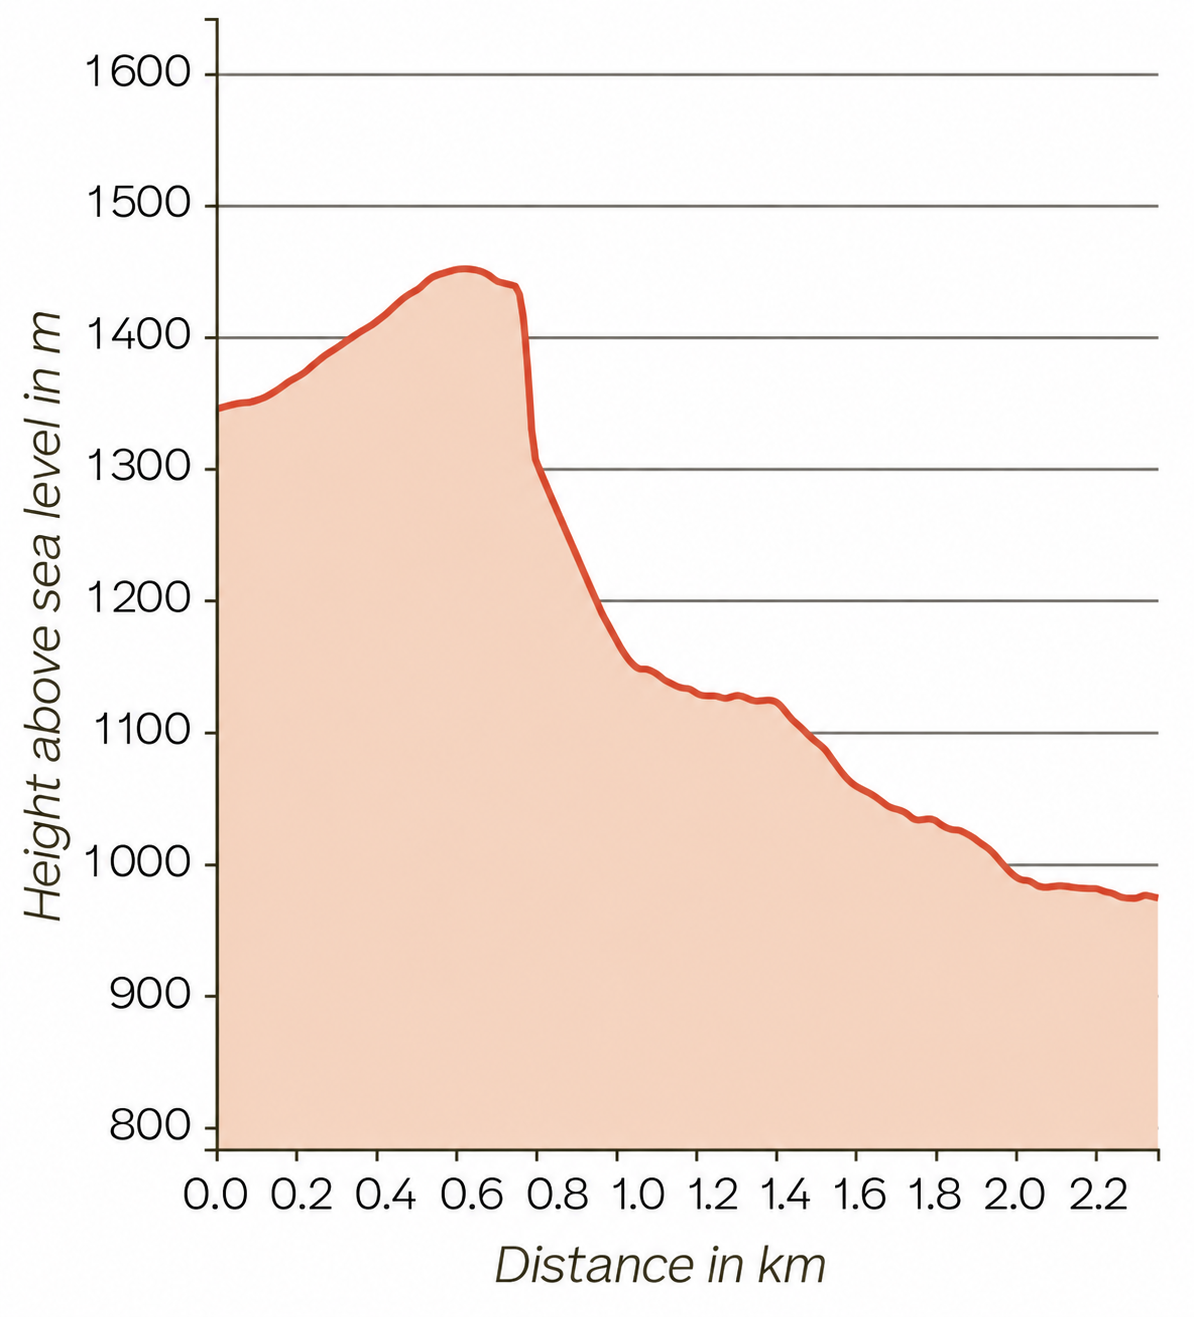 Elevation cross-section at Creux du Van.
Slope angle
The closer the contour lines, the steeper the ground. Slopes are expressed in degrees (°) or percentages (%). A gradient of 1% means the ground rises by 1 m over a horizontal distance of 100 m. Knowing the slope angle is particularly important in winter, because slopes steeper than 30° (58%) are especially prone to avalanches.
Relief shading
You will notice yellow and grey shading on the map. This helps distinguish slopes facing different directions. It does not show actual lighting conditions: it simulates light from the north-west at an angle of 45°.
 Relief shading between Villarsiviriaux and Avry-devant-Pont, FR.
Spot heights
At important or exposed locations, the height is given to the nearest metre. A location on a slope is marked with a dot. Hilltops and mountain summits are marked with an “x”.
 The summit of Piz di Rüss, canton of Graubünden, and nearby spot heights.
Looking after a map
There are three basic rules:
- Always orient the map to north.
- Only write on the map in pencil.
- Handle it carefully: paper maps tear easily along folds.
Reading a map
Reading a map means repeatedly comparing it with your surroundings and checking exactly where you are. Maps simplify the landscape, so focus on features you can easily recognise both on the map and on the ground. These include the course of roads, distinctive structures such as ruins or churches, isolated buildings such as towers, and trees.
While walking, it can help to pick out distinctive features on the map and look for them as you go. For example, if the map shows a fountain at the edge of a wood, look for it as you leave the trees. Seeing it confirms that you are on the right route.
Reading coordinates
Coordinates can specify a position to the nearest metre. This is especially useful where there are no distinctive nearby features you could use to describe a location on the map. Use a ruler for an accurate coordinate reference. Squared paper can also help if you do not have a ruler, but check the size of its squares.
Finding a point on the map
First look at the kilometre part of the coordinate reference: 2 559 297 / 1 142 435. Find the corresponding grid lines on the map. Their intersection is below and to the left of the point you want.
 Finding the kilometre grid square near Montreux.
Now use the metre values: 2 559 297 / 1 142 435. The point is 297 m east of the 2559 km line and 435 m north of the 1142 km line. Convert these distances using the map's scale. At 1:25 000, they are 11.9 mm east and 17.4 mm north on the map. The point is where these offsets meet.
 Locating a point within the grid square.
Finding the coordinates of a point
Find the kilometre grid values for a particular point, such as your current location or destination. Read the grid lines below and to its left: in this example, 2 665 000 and 1 211 000. Measure the distances between your point and these lines. On this 1:25 000 map, they are 24 mm and 31 mm.
 Reading coordinates near Luzern.
Convert the measurements to distances on the ground: 600 m and 775 m. Then write the complete coordinate reference: 2 665 600 / 1 211 775.
 The complete coordinate reference.
The Compass
A compass helps you navigate by finding north or determining your direction of travel. Its most important part is the freely rotating magnetic needle, which responds to the Earth's magnetic field. The red end points north.
Parts of a compass
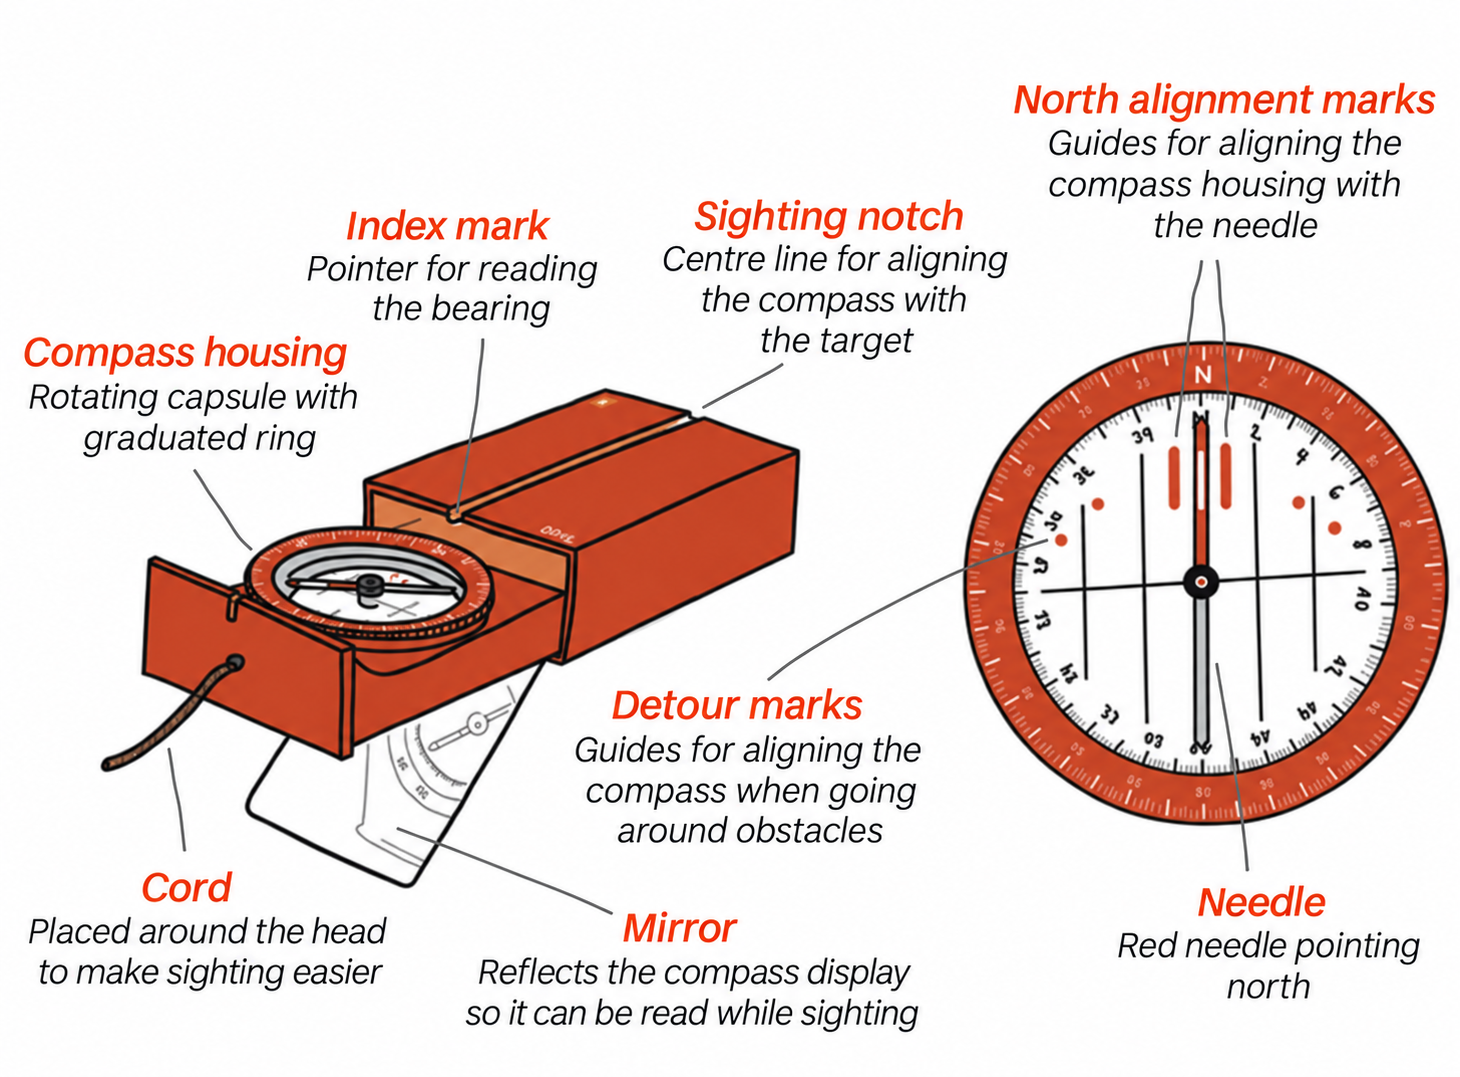 Parts of a compass.
Divisions and bearings
As well as compass points, the compass circle can be divided into degrees (0° to 360°) or, less commonly, artillery mils (0 A‰ to 6400 A‰). These units express a bearing, also called an azimuth: the angle between north and another direction. Measured clockwise from north, east is 90°, south is 180° and west is 270°.
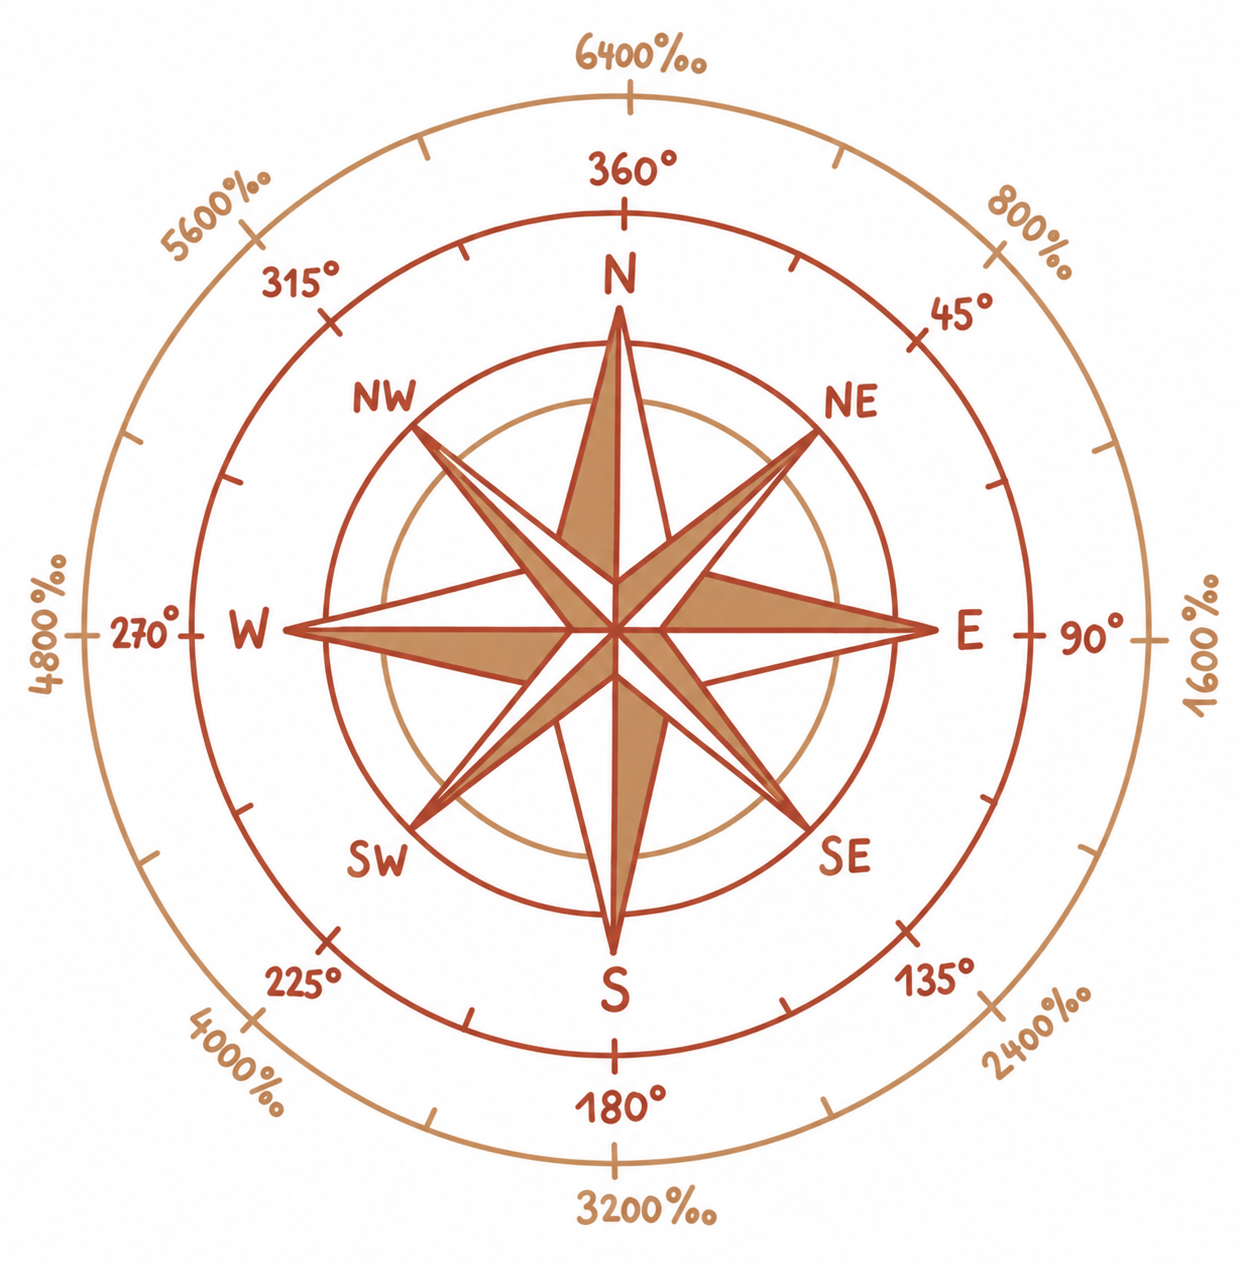 Compass rose.
Handling a compass
Hold the compass level so the needle can turn freely. With the mirror compass shown here, place the cord over your ears so you can look horizontally into the mirror.
Electrical installations, power lines and metal objects can disturb the magnetic field and affect the compass reading.
Using a compass
Orienting a map to north
North is always at the top of Swiss national maps. Maps that use a different orientation show a compass rose or north arrow. To make navigation easier, orient your map to north. Place the compass on the map and turn both together until the needle aligns with north on the map.
 Orienting a map to north.
Taking a bearing
Sight a target with the compass. Turn the compass housing until the needle lies between the north alignment marks. Read the bearing at the index mark on the scale.
Measuring and plotting a bearing on a map
You can measure or plot a bearing on a map without orienting the map to north. Place one edge of the compass along the desired line, then turn the compass housing until its north alignment marks are parallel to the map's north–south grid lines. Read the bearing from the scale.
 Measuring a bearing on a map.
To plot a bearing, reverse these steps. Set the required bearing on the scale, then align the north marks with the map's north–south grid lines. Draw the bearing line along the compass edge.
Walking on a bearing
If poor visibility prevents you from navigating by landmarks, a bearing can give you your direction of travel. Set it by turning the compass housing. Turn yourself and the compass until the needle lies between the north alignment marks. Pick a visible target along your line of sight and walk to it. If there is no suitable landmark, direct a friend to a visible position along that line and walk to them. Repeat until you reach your destination.
 Walking on a bearing.
Going around an obstacle
If you meet an obstacle such as a lake while following a bearing, you need to go around it. Turn away from the obstacle until the needle lies between the next set of detour marks. Walk in that direction and count your steps until the obstacle no longer blocks your original direction. Follow your original bearing again, with the needle between the north marks. Once past the obstacle, turn back towards it until the needle lies between the opposite detour marks. Walk the same number of steps as before. You are now back on your original line and can continue on your bearing.
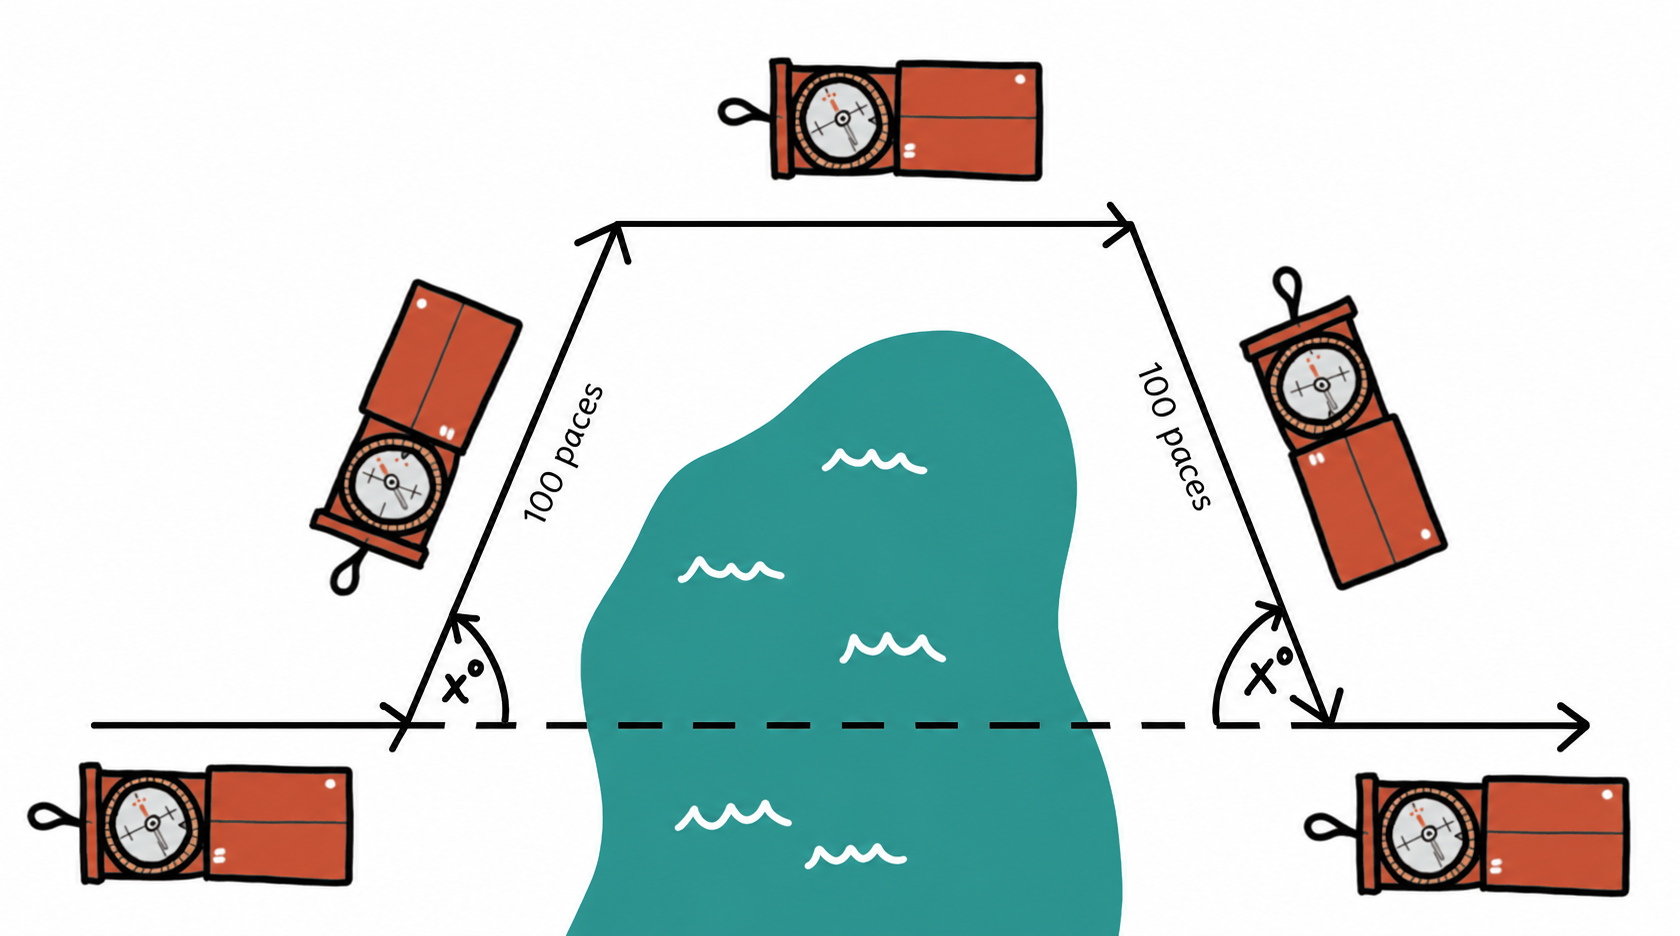 Going around an obstacle.
Resection: finding your position
If you do not know exactly where you are on the map, but can identify at least two distinctive landmarks both on the ground and on the map, you can use them to find your position. This compass technique is called resection.
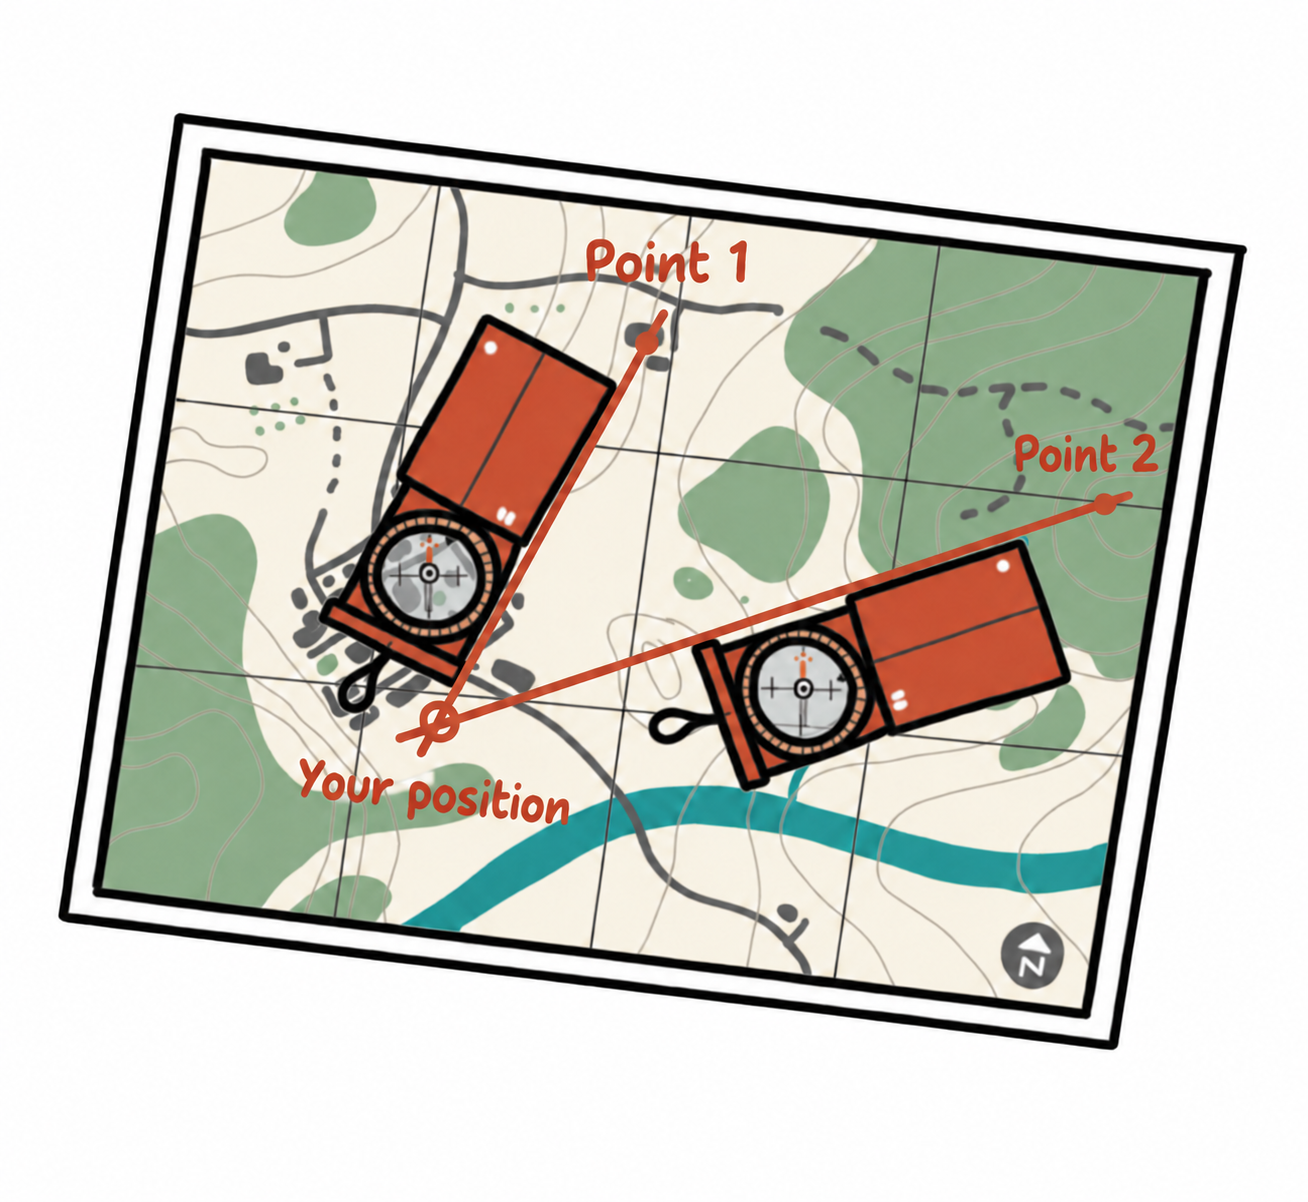 Finding your position by resection.
Find and mark both landmarks on the map. Take a bearing to each and plot the bearing line through the corresponding landmark. Extend the lines with a ruler if necessary. Their intersection shows your position. Using three landmarks improves accuracy. If you can identify only one landmark, plot its bearing and compare the map with your surroundings to estimate where you are along that line.
Intersection: locating a distant point
To locate a distinctive feature on the map, you can use intersection. You must know your own position. From that position, take a bearing to the feature and draw the line on the map. Move to a second known position and repeat. Extend the two lines until they meet: their intersection is the feature's location.
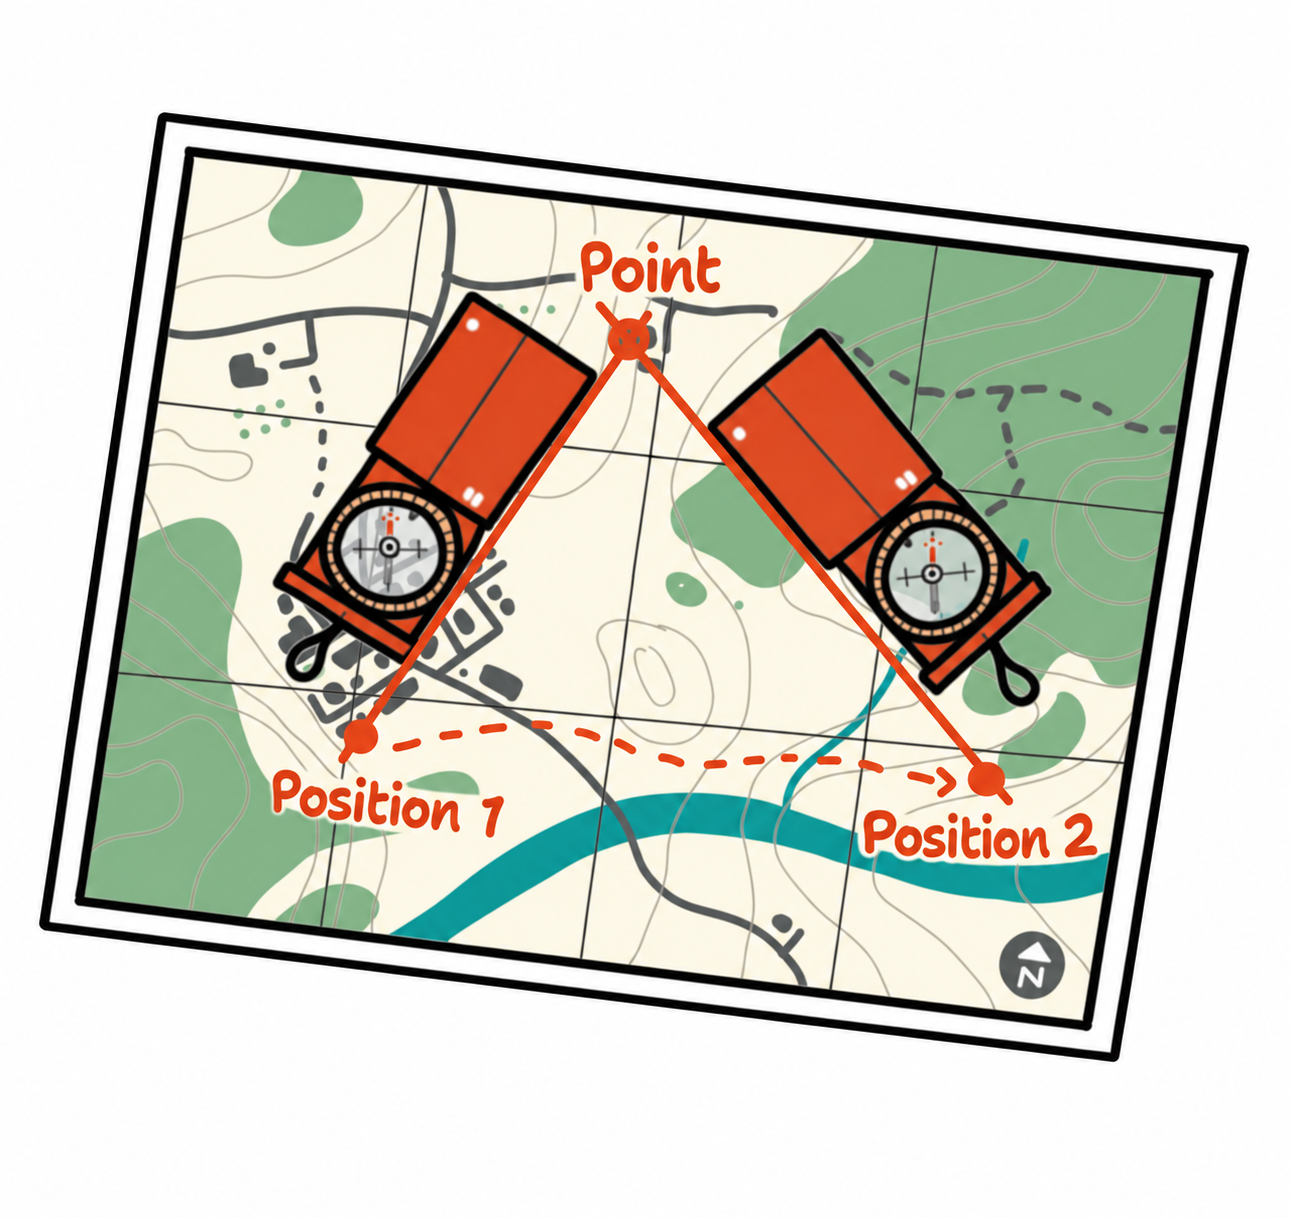 Locating a distant point by intersection.
Navigating without a Map or Compass
There are several ways to estimate compass directions without a map or compass. These clues relate to conditions in Switzerland and the northern hemisphere:
- The sun rises in the east, is in the south around midday and sets in the west.
- The Pole Star indicates north.
- North-facing and north-east-facing slopes are often shadier and retain snow for longer.
- Weather often comes from the west. Moss on trees and rocks and weathering on building façades can offer clues, but they are unreliable on their own.
- Use an analogue watch: point the hour hand towards the sun and bisect the angle between it and 12 o'clock. This gives an approximate southerly direction when the watch shows standard time; adjust for daylight saving time.
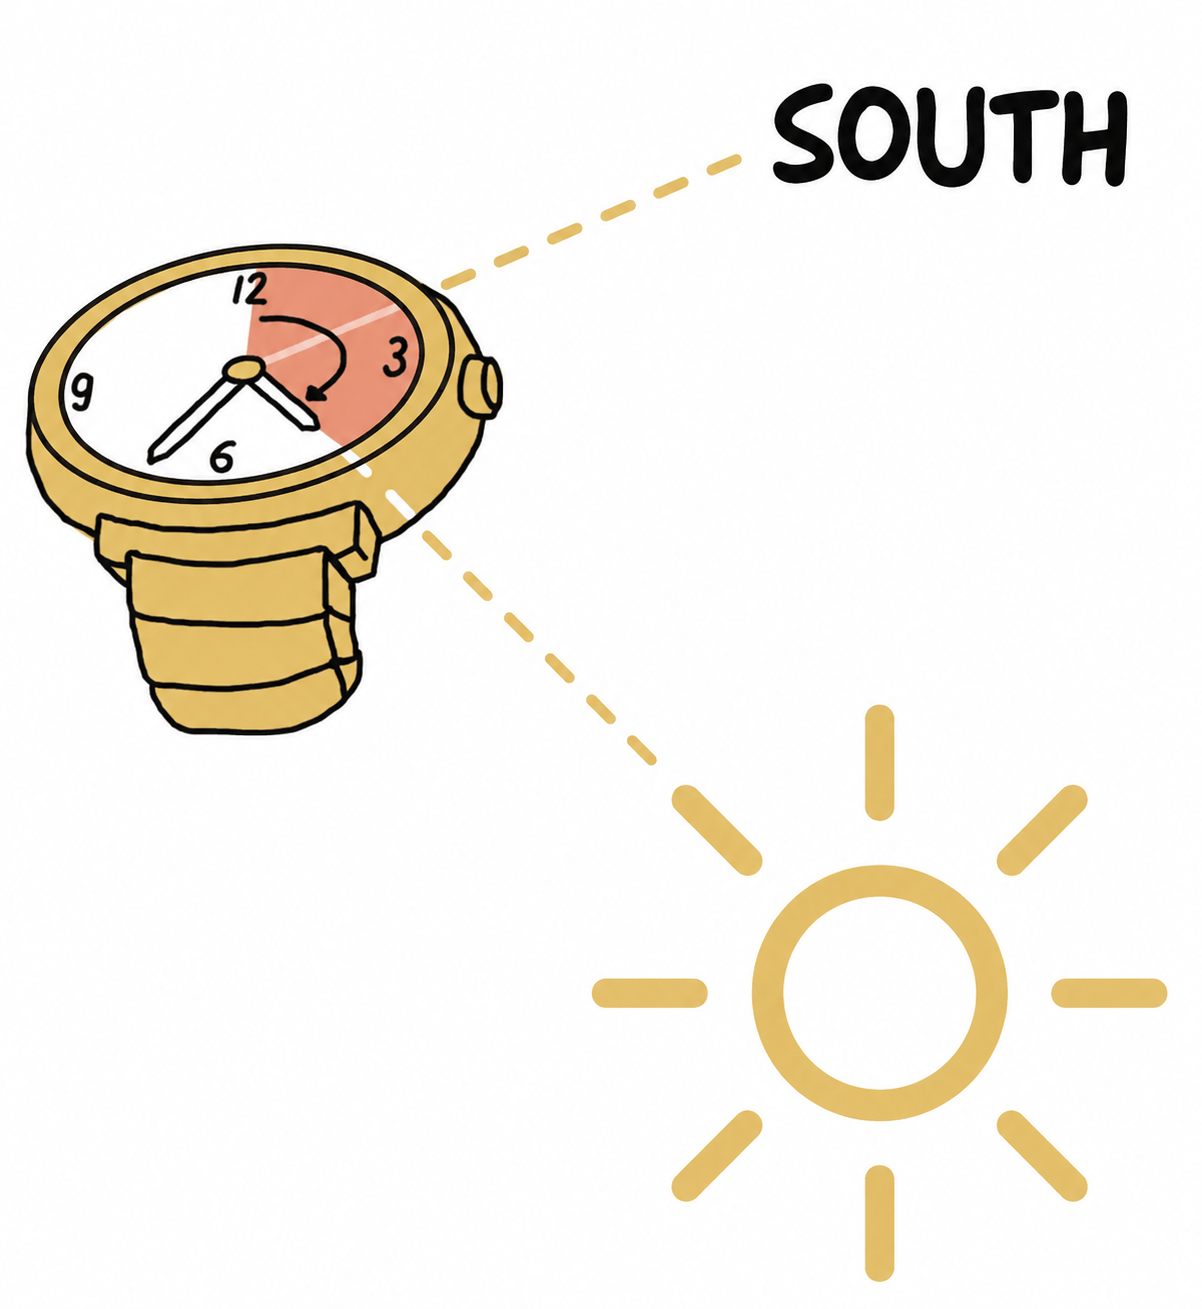 Estimating south with an analogue watch.
Sketch Maps
Sketch maps are hand-drawn maps or plans used for navigation. The general rule is less is more! Draw only what is necessary and simplify as much as possible. Use clear lines and add useful information: a title, your name, the date and time, a key, north and an approximate scale. Types include plan sketches, panoramic sketches, route sketches and compass sketches.
Plan sketch
A plan sketch is closest to a map. Highlight landmarks such as trees, streams and buildings, and add information in words.
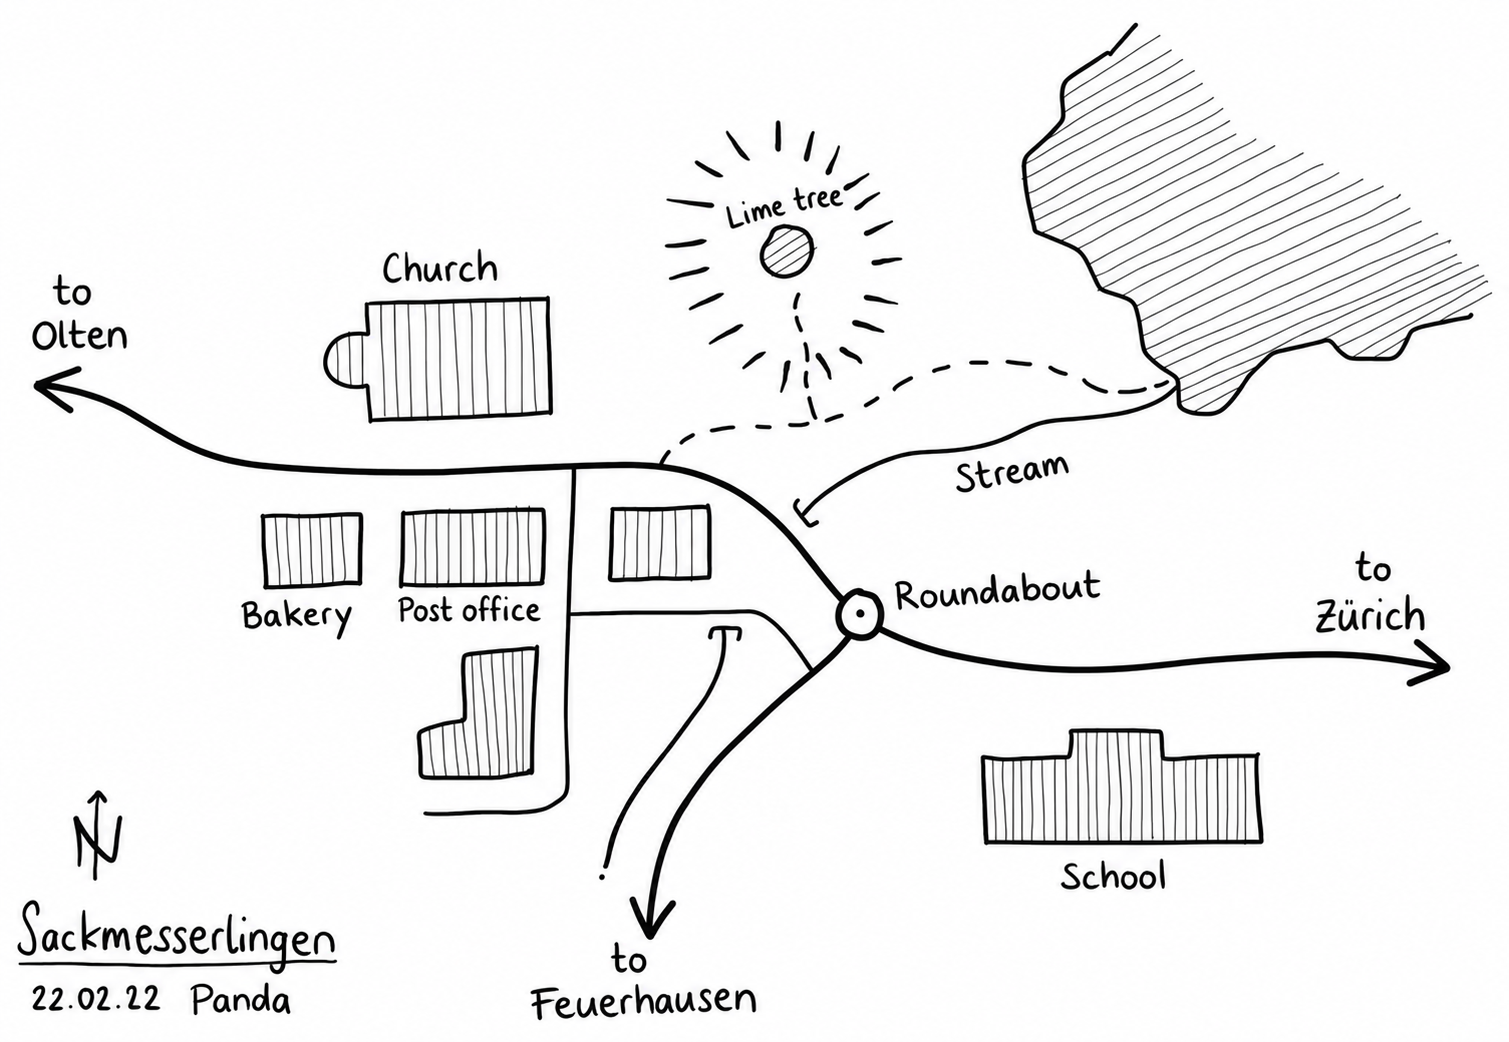 Example of a plan sketch.
Panoramic sketch
A panoramic sketch shows a view of your surroundings, rather like a photograph. Draw nearby objects with thick lines and more distant ones with thin lines. Use vertical hatching for buildings, diagonal hatching for trees and woods, and horizontal hatching for water. You can use a panoramic sketch to explore an area or organise a treasure hunt.
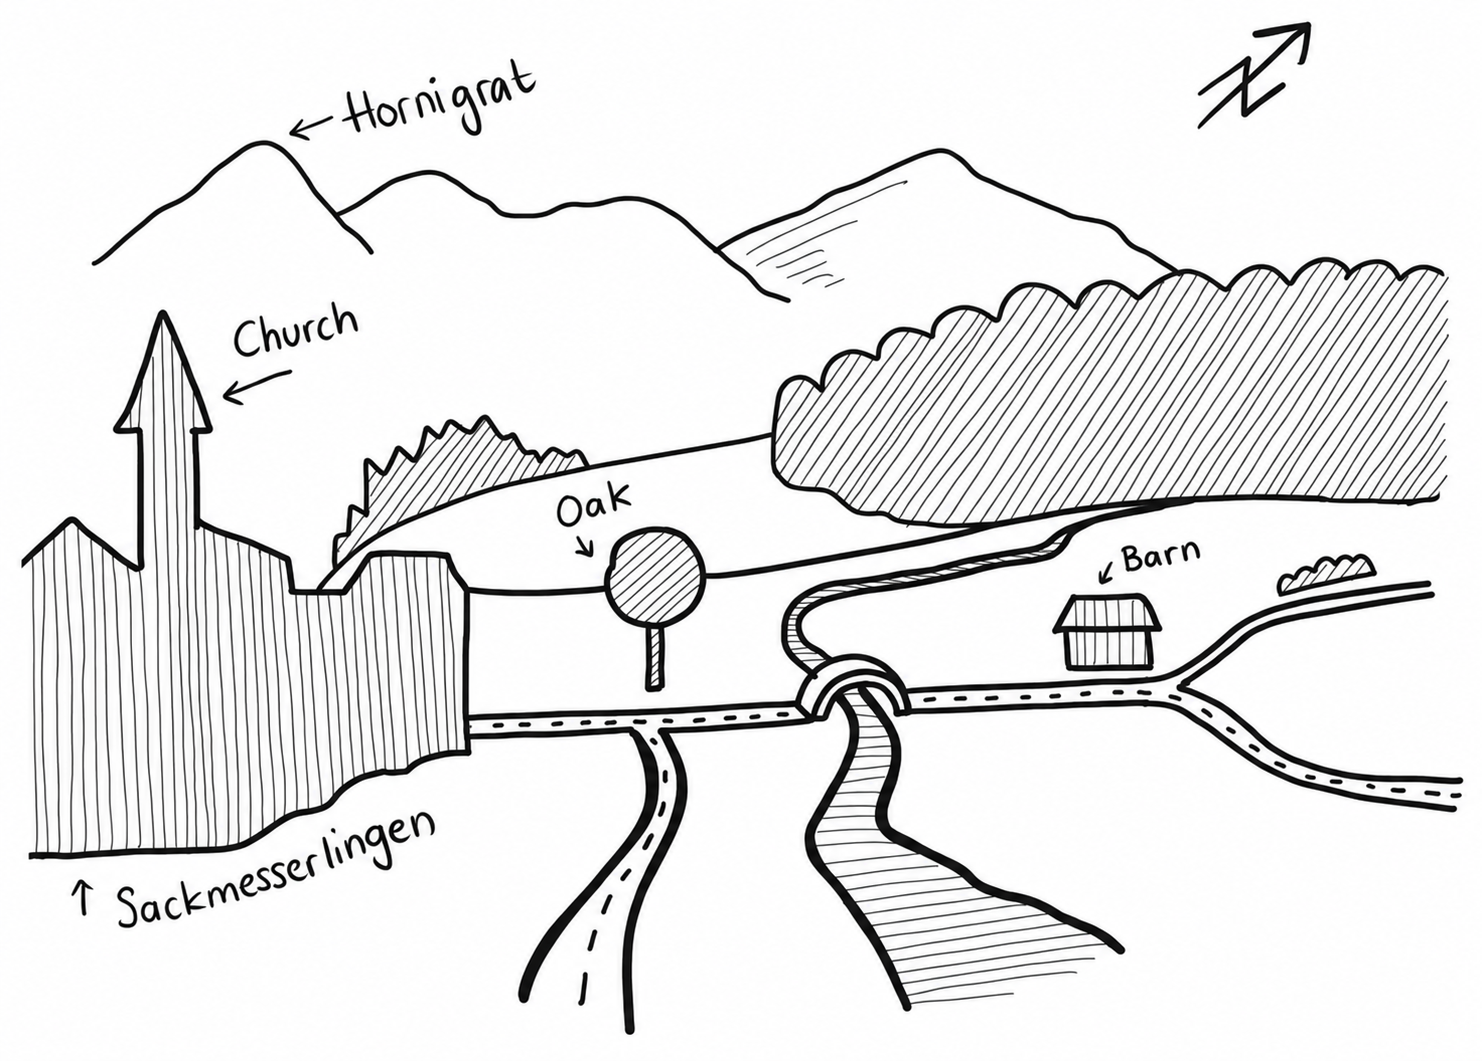 Example of a panoramic sketch.
These symbols are used in panoramic sketches:
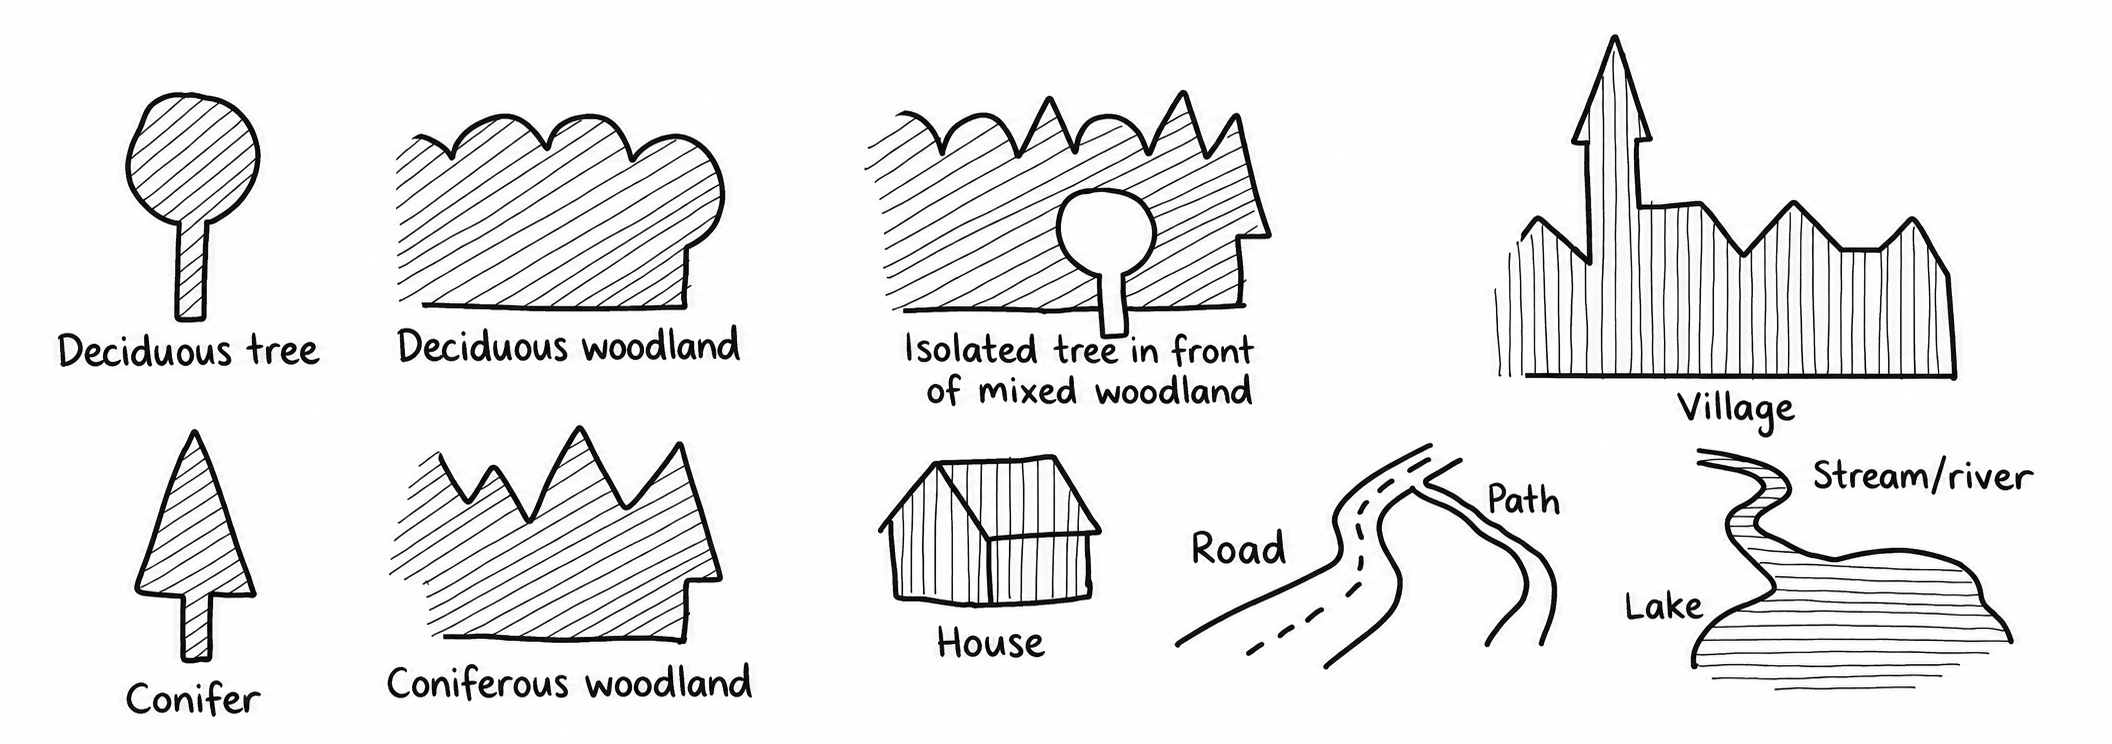 Symbols for panoramic sketches.
Route sketch
A route sketch shows the main features to the left and right of a route, represented by a line. You could use one when checking a walking route in advance.
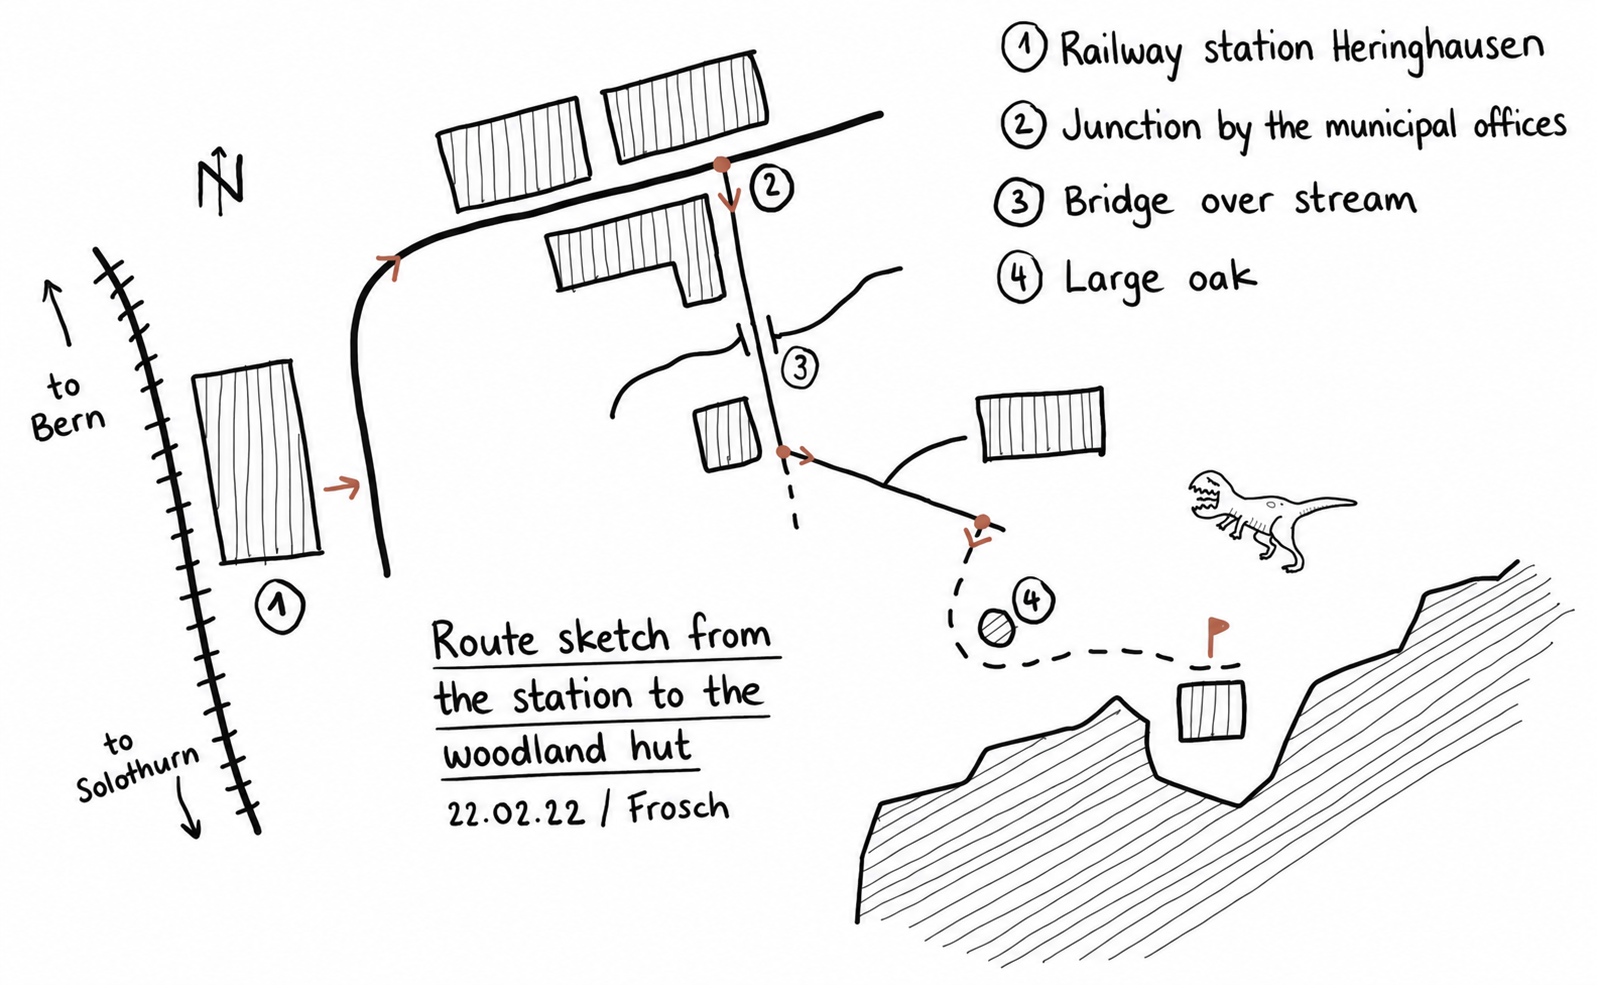 Example of a route sketch.
Compass sketch
A compass sketch records the bearings and distances of individual legs of a route, helping you navigate in difficult conditions.
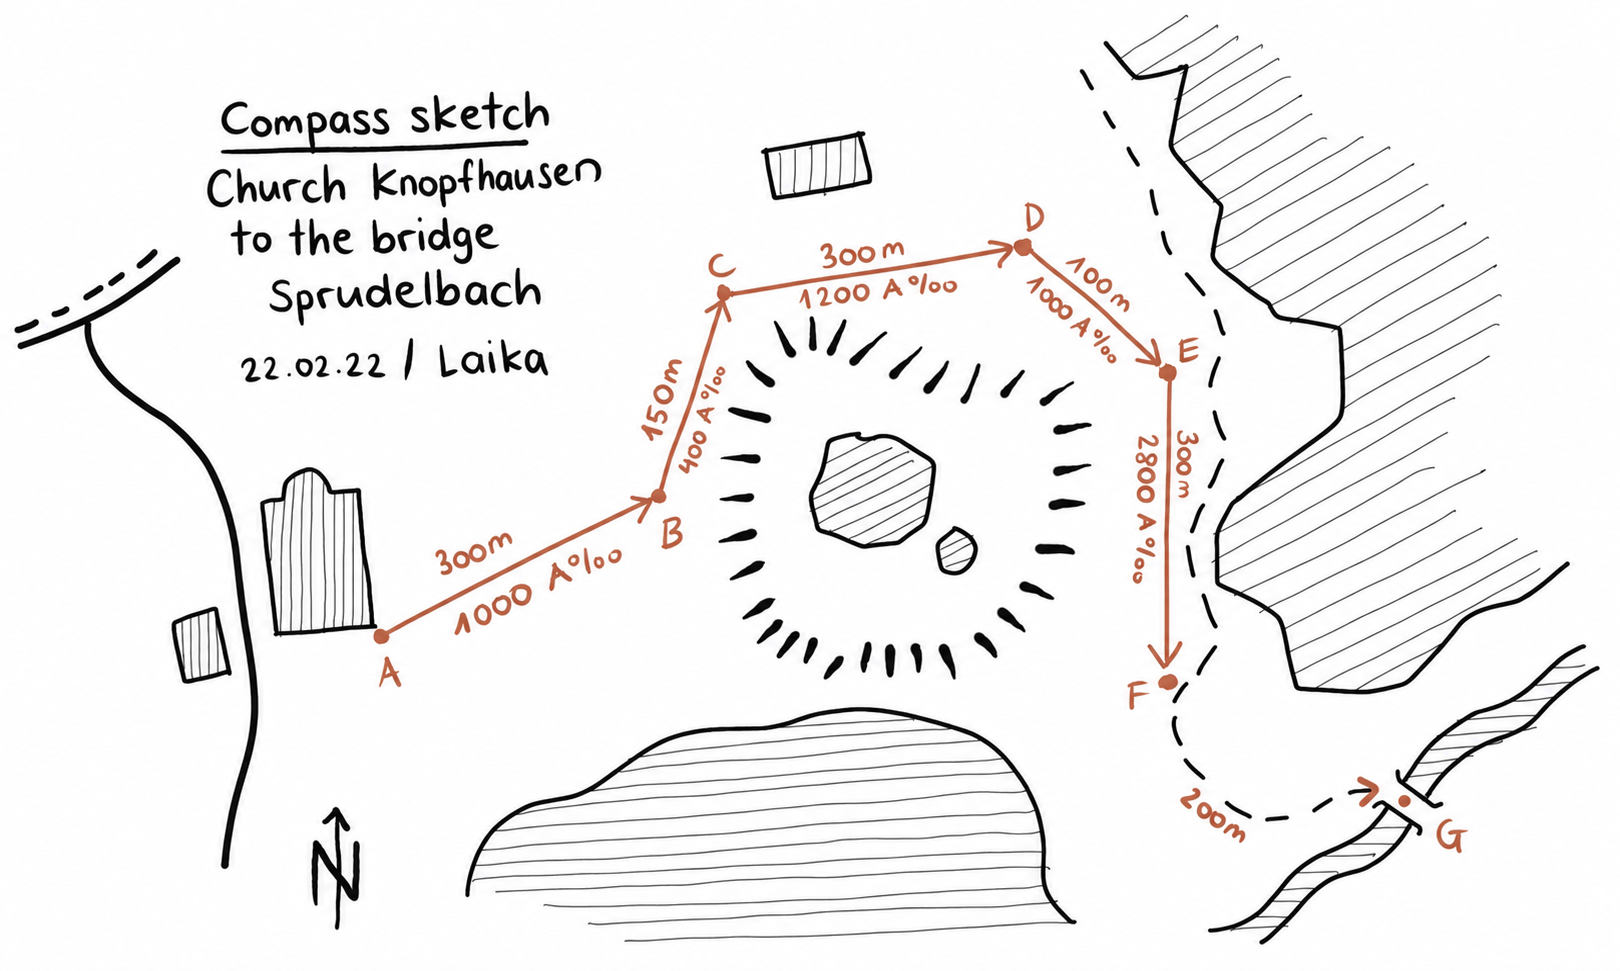 Example of a compass sketch.
Plan, route and compass sketches use the following symbols:
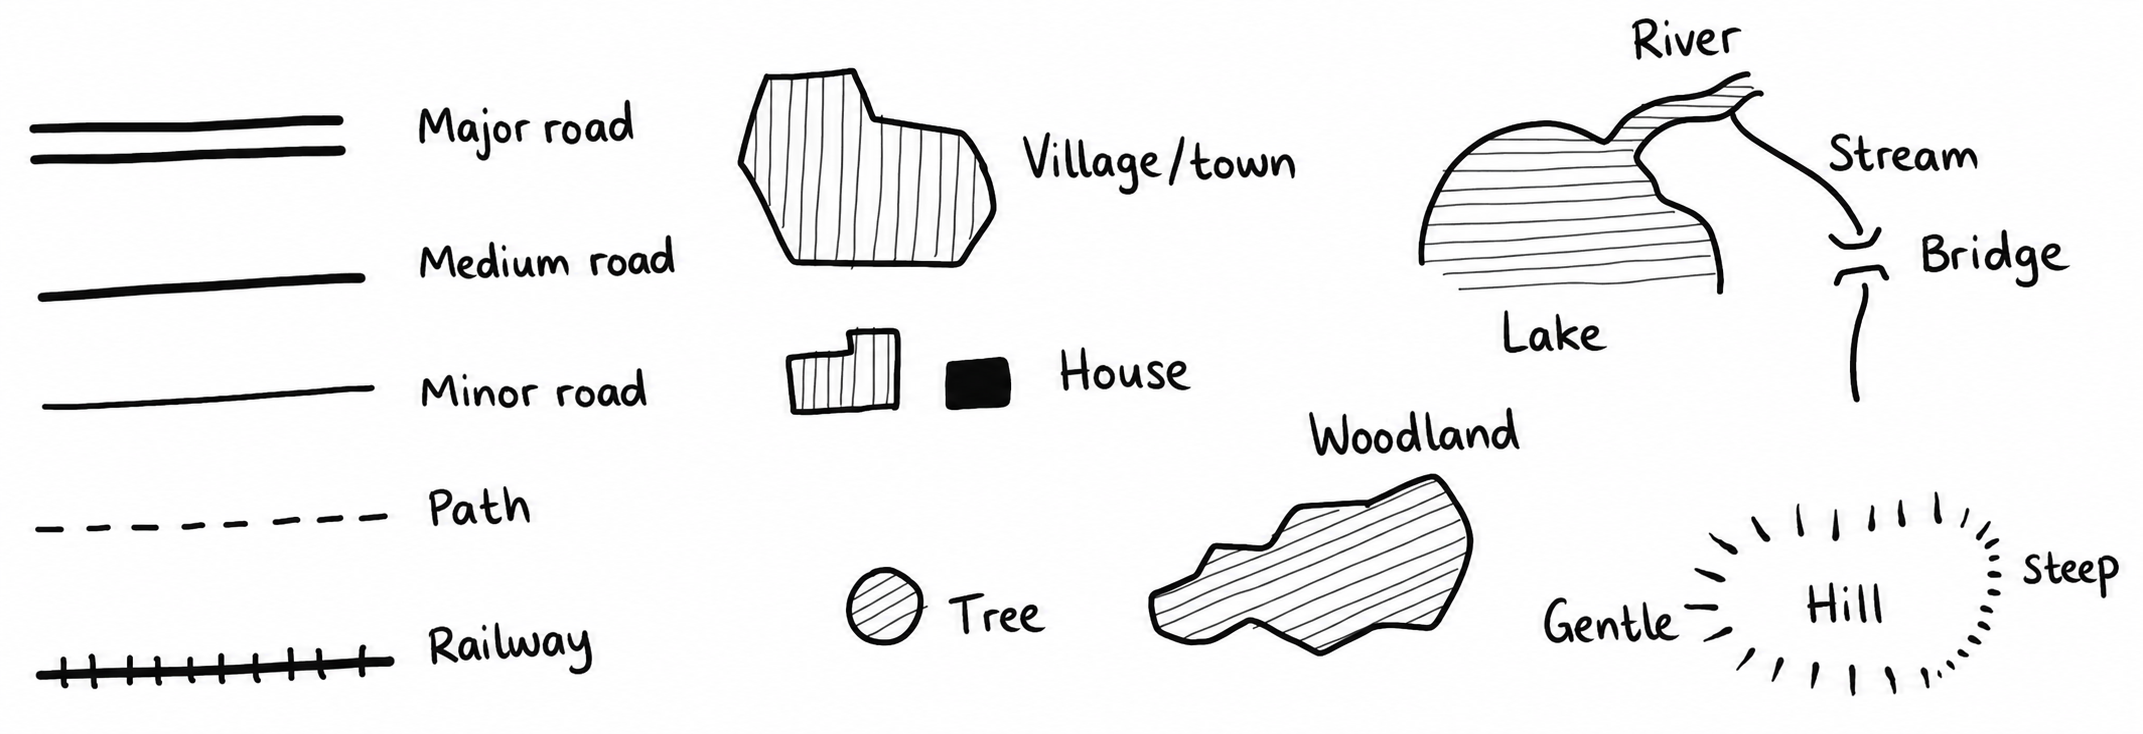 Symbols for plan, route and compass sketches.
Estimating and Measuring
You cannot always measure distances or weights, but a few tricks can help you estimate them.
Reference measurements
Reference measurements make estimation quick and easy. Knowing your own body measurements helps you estimate other sizes.
Other reference measurements:
| Coin | Weight | Diameter | Thickness |
|---|---|---|---|
| CHF 5 | 13.2 g | 31.5 mm | 2.4 mm |
| CHF 2 | 8.8 g | 27.4 mm | 2.2 mm |
| CHF 1 | 4.4 g | 23.2 mm | 1.6 mm |
- Swiss army tent sheet: 1.65 m × 1.65 m
- Tent-pole section: 41.5 cm
- Scout cooking pots: 14 L: Ø 34 cm; 10.5 L: Ø 30 cm
- Mess tin: main container 2 L; lid 0.6 L; insert 0.5 L
- Water: 1 L = 1 kg
- Squared paper: 4 mm or 5 mm squares
Estimation methods
Thumb jump
To estimate the distance to an object, hold your thumb up at arm's length. Close one eye and align the thumb with the edge of the object. Then switch eyes. Your thumb appears to jump sideways. Estimate the distance between its two apparent positions. The distance from you to the object is roughly ten times that distance. You can also use this method to estimate a height.
 Estimating distance with the thumb-jump method.
Similar triangles
Similar triangles let you estimate an object's height fairly accurately. Place an object of known height so that, viewed from ground level, it exactly covers the object of unknown height. Measure the distances from your viewing point to both objects. Then calculate the unknown height as shown:
 Calculating height with similar triangles.
Suppose you have a stick exactly one metre long and position it so that it appears as tall as the tree. The distance from you to the stick is 1.5 m, and from you to the tree 6 m. The formula gives a tree height of four metres:
6 m × 1 m ÷ 1.5 m = 4 m
Comparing
Compare the height of a tower with a person standing beside it. Estimate how many times the person's height would fit up to the top of the tower. Multiply that number by the person's height to calculate the tower's height.
 Estimating height by comparison.
Water flow speed
Measure how far a branch travels in a watercourse in 36 seconds. Divide that distance in metres by 10 to obtain the flow speed in km/h. Be aware that measurements near the bank are less reliable because the flow is slower there.
 Estimating the speed of flowing water.
Counting seconds
Counting slowly upwards from twenty-one gives approximately one second per number.
Pendulum
A pendulum one metre long takes approximately two seconds for a complete swing out and back, or one second for each half-swing.
Free fall
To estimate a height, drop a small stone and count the seconds until impact. Make sure no person or object can be harmed. Estimate the height in metres by multiplying the fall time by itself and then by five:
 Height in metres ≈ fall time in seconds × fall time in seconds × 5.
Time until sunset
With your arm outstretched, count how many finger widths fit between the sun and the horizon. One finger width represents approximately 15 minutes. Looking directly at the sun damages your eyes. Use this trick only briefly and when the sun is low.
Distance to a thunderstorm
When you see lightning, count the seconds until you hear thunder. Sound travels at about 340 m/s, so thunder covers one kilometre in three seconds. If you hear it after six seconds, for example, the storm is about two kilometres away.