Outdoor Life

In Scouting and Guiding, we love being outdoors. It helps to know how to travel in the open air and what you can discover there.
Respecting Your Surroundings
Whenever you are outdoors—in woods, mountains, fields or a town—you are entering the living space of animals, plants and other people. Follow these principles:
- Before leaving home, check for nature reserves, wildlife quiet zones and game reserves.
- Follow local instructions and restrictions.
- Stay on marked paths.
- Ask the landowner before pitching a tent in a field.
 A Scout and Guide group outdoors.
- Leave no trace and take all rubbish away for proper disposal.
- Treat trees and other plants with care.
- Do not pick plants or capture animals or insects.
- Remember that many animals are active at dusk and at night.
- Leave gates and fence openings as you found them.
- Keep well away from animals with young when crossing pastures, or choose another route. They can become aggressive quickly.
- Avoid unnecessary noise.
Out and About
Planning
Before setting off on an adventure, prepare by asking:
- Where do we want to go?
- How will we travel: on foot, by bicycle, public transport, scooter or on water?
- When: what time of day and year? Are there public holidays or special opening hours?
- Where will we sleep: in an igloo, hut, tent or bivouac?
- Who is coming?
- What is our budget?
 Different ways of travelling.
Once the outline is clear, plan the route and its stages:
- What alternative routes are available? How can we abandon the trip? Where is the point of no return?
- What equipment do we need? Is there a packing list? Do we need reservations?
- Will there be additional activities?
- Where can we get help in an emergency?
Consider these questions at home, before setting off and along the way:
- What are the conditions? Is a thunderstorm or strong wind approaching? Will it be very hot or cold? Is rain or snow expected? Is visibility poor? When will it get dark?
- What challenges does the terrain present? Are there nature reserves or other protected areas? Are there hazards such as scree slopes or steep ground?
- What is the group like? What are the participants' physical and emotional needs? Consider motivation, group dynamics and wellbeing. Should you split into groups with different abilities?
Use national maps and the official walking-trail network to plan. Always check the route in advance and remember that conditions can change quickly with the season.
- Point of no return: the point beyond which continuing to the destination is easier than turning back.
Walking and cycling routes at a glance
| Walking trail | Mountain walking trail | |
|---|---|---|
| Signs and markings |  Yellow walking-trail signpost.  Walking-trail marker. |
 White–red–white mountain-trail marking.  Mountain walking-trail signpost. |
| Requirements | No special requirements | Good fitness, sure-footedness, a head for heights and knowledge of mountain hazards |
| Notes | Snowfields and falling rocks may occur into July. |
| Alpine walking trail | Winter walking trail | Cycle route | |
|---|---|---|---|
| Signs and markings |  Alpine walking-trail signpost.  White–blue–white alpine-trail marking. |
 Winter-trail marker post.  Winter walking-trail signpost. |
 Cycle-path sign.  Cycle-route signpost. |
| Requirements | Mountain-trail skills plus familiarity with an ice axe, rope and climbing sections | Good balance because of slippery surfaces | Vary by route |
| Notes | Often crosses ridges, glaciers and scree. Not suitable for ordinary Scout and Guide activities; use only with mountain guides. | A snowshoe symbol instead of a walker indicates a snowshoe route. | There is no equivalent graded system to walking trails. Route checks and map study are important. |
Travelling on foot
Walking is a simple, natural way to travel. It takes you to places you could not otherwise reach, and its gentle pace lets you notice your surroundings.
For group walks:
- Take regular breaks to rest, check everyone's wellbeing and adjust equipment.
- Stay on marked paths.
- Where there is no footway and walking along a road is necessary, walk in single file facing oncoming traffic, normally on the left in Switzerland. Leave gaps in a large group.
- Split large groups and appoint people to walk at the front and rear. The first-aid kit stays with the rear leader.
Estimating walking time
Mark the high and low points of the route on a map and note their elevations. Measure the distances between them with string. This gives you the information to calculate effort kilometres, a way to compare routes by time and energy required.
 Distance and ascent expressed as effort kilometres.
One effort kilometre represents 1000 m horizontally, 100 m of ascent or 150 m of steep descent.
Measure the route distance in kilometres, add one effort kilometre for every 100 m of ascent, and add one for every 150 m of steep descent. Add these across the whole route. Divide the total by your speed in effort kilometres per hour to obtain walking time.
A typical planning speed is 3–5 effort kilometres per hour. Allow a slower pace for difficult terrain, extreme weather, darkness, poor paths, inexperienced or large groups, and the group's wellbeing.
Formula:
- Horizontal distance in km + (ascent in m × 0.01) + (steep descent in m × 0.0067) = effort kilometres
Example: Ulrichen to Randstafel
- Point A: Ulrichen, 1345 m above sea level
- Point B: Obergesteln, 1354 m; distance 1.75 km from A
- Point C: Randstafel, 1943 m; distance 3.29 km from B
 Example route from Ulrichen to Randstafel.
Elevation difference A–B: 1354 − 1345 = 9 m. This small difference can be ignored for this estimate.
Elevation difference B–C: 1943 − 1354 = 589 m.
Insert the values: 1.75 + 3.29 + (589 × 0.01) = 10.93 effort km.
At four effort kilometres per hour, the walking time, excluding breaks, is:
- 10.93 effort km ÷ 4 effort km/h = 2.73 h ≈ 2 h 44 min.
Equipment
Clothing
Clothing makes a big difference to comfort. Layering several thin garments lets you adjust your temperature by adding or removing a layer. Use a neckerchief or hat for sun protection. Always pack a waterproof jacket, even if no rain is forecast. Long trousers tucked into socks help protect against ticks.
 The layering principle.
Footwear
Walking boots are your most important equipment. They should fit well, be dry and already worn in. Choose good walking socks. Blister plasters applied in advance, or a second pair of socks where suitable, may help prevent blisters.
Rucksack
Choose a size suited to the activity, with comfortable chest and hip straps. Pack as much as possible inside; attach only light or bulky items outside. The total load should not exceed one quarter of your body weight; choose a lighter load appropriate to your age and ability. A rain cover is useful, though the back of the bag may still get wet. Keep frequently used items such as a pocketknife, tissues and water bottle accessible.
 Packing a rucksack.
Food and drink
Carry enough drinking water with a reserve: you may not know where the next safe supply is. Allow approximately 2–2.5 litres per day, excluding cooking and washing, and increase this for heat and exertion. Compact, energy-rich snacks include dried fruit, nuts, bars, bread and fresh fruit.
Travelling by bicycle
Many walking principles also apply to cycling, with these differences:
- Use marked cycle routes where possible.
- Make groups of similar ability and stay together. Limit each group to ten bicycles so vehicles can overtake safely.
- Plan enough breaks and wait for groups behind.
- Heavily loaded bicycles need longer to stop.
- Check bicycles beforehand and assess participants' riding skills.
- Follow the traffic rules carefully.
Estimating time
Cycling time depends heavily on the route and group. About 12 km/h may be reasonable on level ground, but climbs, rough surfaces and luggage reduce speed sharply. Riders' abilities matter too. Effort kilometres cannot be applied as simply as for walking. Planning needs experience and good knowledge of the group. Official cycle-route information can help.
Equipment
Clothing
Padded cycling shorts and gloves prevent chafing and improve comfort. Protect yourself from the sun: the breeze can hide how strong it is. Always carry a waterproof jacket. A well-fitting helmet is required for Scout and Guide cycling activities.
Bicycle
A roadworthy bicycle needs two functioning brakes, a white front light, red rear light, front, rear and pedal reflectors, and sound tyres. Bring a bell and lock too. Panniers spread the load and spare your back. Each group should carry a first-aid kit, suitable spare parts and tools, and a pump.
- Distribute luggage approximately one third at the front and two thirds at the rear.
 Bicycle equipment and luggage distribution.
In and around Water
Water activities are refreshing and fun, but water also brings dangers. Careful planning and knowledge of water safety are essential.
Water hazards
Water can be deceptive and dangerous situations develop quickly. To lead a Scout and Guide group activity in or beside water, you need the additional training required by Jugend+Sport for that activity.
Not everyone can swim equally well—or at all. Know your unit's abilities. Even strong swimmers can drown.
Your body can cool quickly even in pleasant water. Dry yourself thoroughly and put on warm clothes after swimming. Never enter the water during a thunderstorm: water conducts electricity and lightning is especially dangerous.
If local conditions make you unsure, or you cannot assess your group's swimming abilities, leave out activities in or immediately beside the water.
Places to swim
Different waters and facilities have different hazards, whether supervised or not.
Outdoor and indoor pools
Most pools have lifeguards, but do not rely on them alone. Leaders must still supervise their group. Busy pools and large groups make it difficult to keep an overview, including in the non-swimmer area.
Lakes
Swimming is generally possible in Swiss lakes, but check local permission and restrictions beforehand. Nature reserves and reservoirs may be partly or wholly closed to swimming.
Most lakes have no official lifeguard service: you are responsible for assessing the risk. At lakeside swimming facilities, a flag shows whether lifeguards are on duty.
Cloudy water makes depth and underwater hazards difficult to judge. Never jump into unknown, murky water; sharp stones or broken glass may be hidden.
Warning lights around larger lakes and harbours indicate strong winds at 40 flashes per minute or a storm at 90 flashes per minute. Leave the water immediately and tell others. These lights warn of strong wind; they may not activate for a thunderstorm without strong winds.
Streams and rivers
Streams and rivers are difficult to assess. Water levels and currents can change quickly, and even a distant storm can cause a sudden rise. Hidden currents, eddies, debris and submerged obstacles may be invisible from the bank or appear suddenly.
River swimming is only recommended for very strong, experienced swimmers, within the relevant activity and supervision requirements.
Swimming rules of the Swiss Lifesaving Society (SLRG)
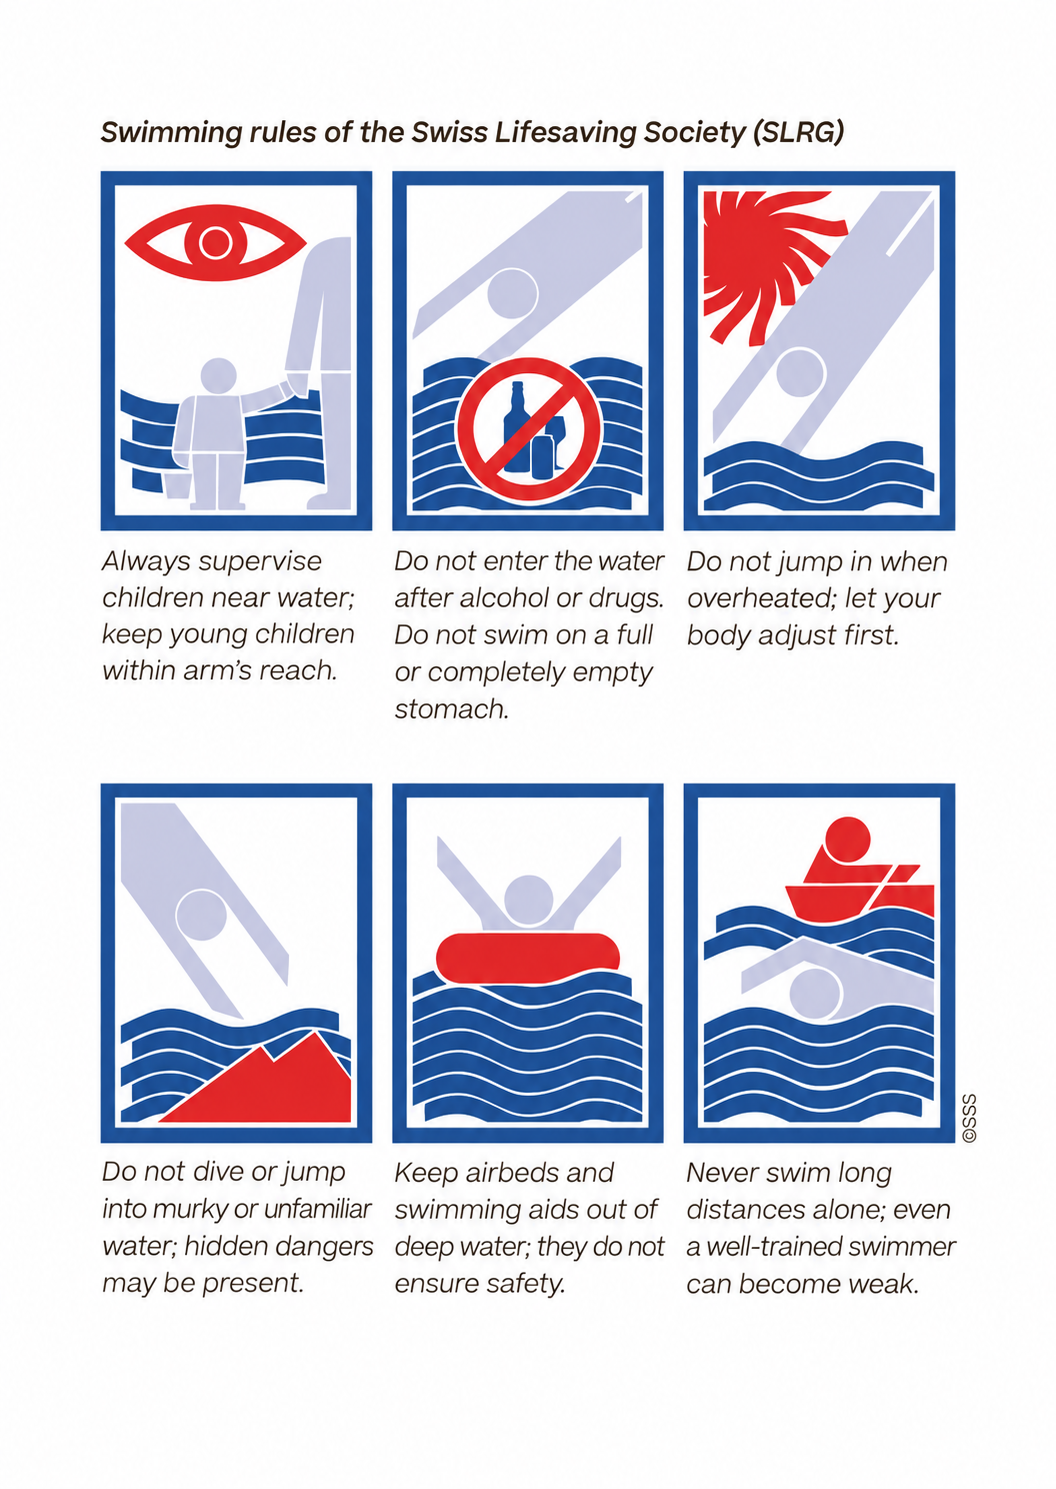 The SLRG swimming rules.
Equipment
Swimming aids
Armbands, pool noodles and inflatable balls never replace supervision by leaders. Do not let them create a false sense of safety.
Lifejackets
Inexperienced swimmers should wear a suitable lifejacket in and near water. Even experienced swimmers should wear one in and beside rivers. The jacket must match the wearer's weight, fit and activity. Some activities require lifejackets.
Rescue equipment
Know where the nearest lifebuoy, rescue board, throw bag and AED are. If no suitable rescue equipment is available, arrange it yourself before the activity.
Fire
Fire needs three things: fuel, heat and oxygen. If a fire will not burn properly, one is missing. To put it out, remove one of the three.
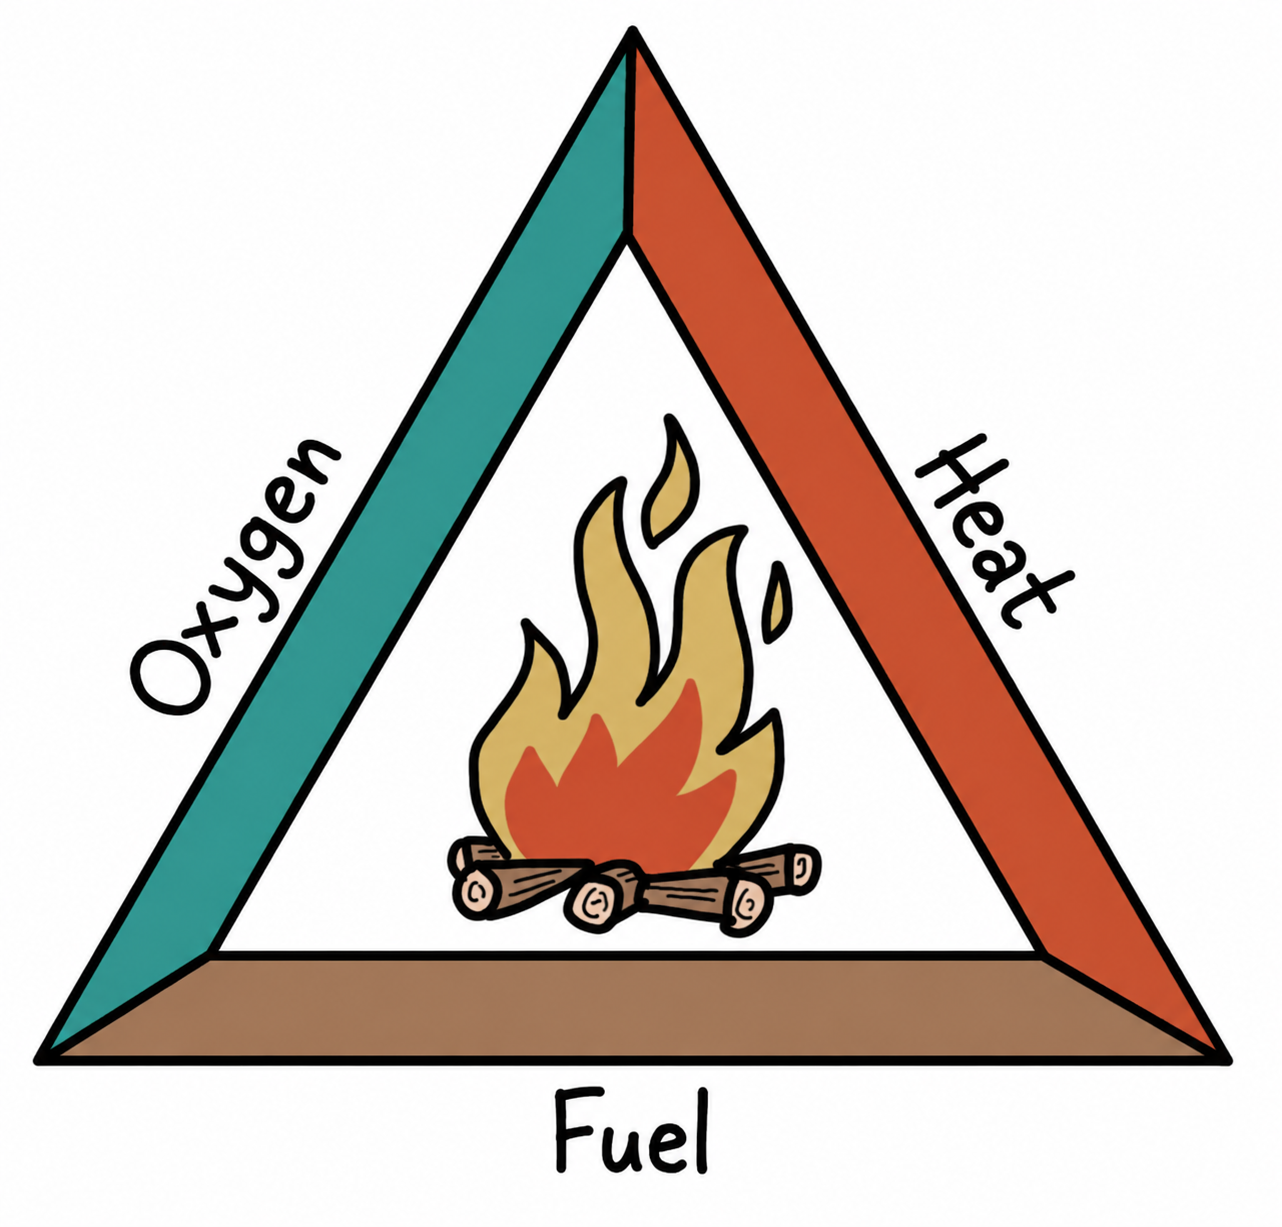 The fire triangle: fuel, heat and oxygen.
Lighting a fire
You need:
- Tinder: newspaper or paper, straw, dry moss, dry grass, fibres or firelighters
- Kindling: thin, dry, easily lit material such as small twigs, wood shavings or birch bark
- Fuel: dry, seasoned wood; start with softwood, then add hardwood
- An ignition source: a lighter, matches, a fire steel or a magnifying glass
Build the fire with tinder, kindling and fuel. Light the tinder while sheltering it from the wind. Add more wood, leaving enough room for oxygen. Blowing or fanning, for example with a pot lid or newspaper, provides more air. In wet or snowy conditions, make a base of suitable stones or logs and dry damp fuel near the fire.
 Building and feeding a fire.
Fire-safety rules:
- Check conditions. Do not light a fire during a fire ban, wildfire danger or strong wind.
- Use an existing fireplace whenever possible.
- If making a new one, remove flammable grass, leaves and twigs and use suitable large stones around it.
- Keep at least 5 m from trees, buildings and tents, and increase this wherever conditions or local rules require it.
- Never leave a fire unattended.
- Decide how to extinguish it before lighting it. In an emergency, you must be able to do so quickly.
- Keep suitable extinguishing equipment ready, such as a fire blanket, enough water or an extinguisher, and know how to use it.
- Extinguish thoroughly with water before leaving: fire can continue below ground.
Prolonged or severe drought increases wildfire danger. Restrictions range from bans on fires in woodland to complete fire bans. Check and follow the cantonal rules for the area.
Weather and Climate
Weather results from the interaction of humidity, temperature and air pressure. We experience it as sunshine, rain, wind and clouds. It can change within minutes or hours.
Climate describes weather patterns over several decades, including averages and extremes of temperature, sunshine, precipitation and wind. Here are common weather phenomena and what they may indicate.
Wind
Air tends to move from high-pressure areas towards low-pressure areas. We feel this movement as wind. Larger pressure differences produce stronger winds. Temperature also affects pressure: warming air expands, becomes less dense and rises, while colder air is denser and sinks.
Beaufort scale
| Beaufort | Description | Speed in km/h | Effects | Illustration |
|---|---|---|---|---|
| 0 | Calm | 0–1 | Smoke rises vertically. |  Beaufort 0. |
| 1 | Light air | 1–5 | Smoke drifts slightly. |  Beaufort 1. |
| 2 | Light breeze | 6–11 | Leaves and weather vanes move. |  Beaufort 2. |
| 3 | Gentle breeze | 12–19 | Small twigs move. |  Beaufort 3. |
| 4 | Moderate breeze | 20–28 | Twigs and thin branches move. |  Beaufort 4. |
| 5 | Fresh breeze | 29–38 | Small deciduous trees sway. |  Beaufort 5. |
| 6 | Strong breeze | 39–49 | Large branches move. |  Beaufort 6. |
| 7 | Near gale | 50–61 | Whole trees move. |  Beaufort 7. |
| 8 | Gale | 62–74 | Twigs break off. |  Beaufort 8. |
| 9 | Strong gale | 75–88 | Branches break and roof tiles lift. |  Beaufort 9. |
| 10 | Storm | 89–102 | Trees break; considerable damage. |  Beaufort 10. |
| 11 | Violent storm | 103–117 | Trees are uprooted. |  Beaufort 11. |
| 12 | Hurricane force | Above 117 | Severe destruction. |  Beaufort 12. |
Clouds
Air contains water vapour, measured as humidity. Relative humidity is 0% when there is no water vapour and 100% at saturation for the current temperature. Warmer air can contain more water vapour before becoming saturated than colder air. When saturated air cools, water condenses into tiny droplets that we see as clouds or fog. Height, temperature and wind produce different cloud forms.
| Cloud type | Possible weather indication | Illustration |
|---|---|---|
| Cirrus | Often associated with fine weather, but may indicate a change. |  Cirrus. |
| Cirrocumulus | These small rippled clouds often occur in fine weather. |  Cirrocumulus. |
| Cirrostratus | May indicate a change within 12–24 hours, often a warm front bringing rain. |  Cirrostratus. |
| Altocumulus | In spring and summer, especially with small towers, may precede afternoon thunderstorms. |  Altocumulus. |
| Altostratus | May precede rain or snow. |  Altostratus. |
| Nimbostratus | Rain-bearing clouds, usually already producing rain or snow. |  Nimbostratus. |
| Stratocumulus | Breaking low cloud may indicate improvement, though these clouds can also accompany change. |  Stratocumulus. |
| Stratus | Low cloud, often dry but sometimes producing drizzle. |  Stratus. |
| Cumulus | Small cumulus clouds often accompany fine weather. Tall growth may lead to showers or thunderstorms. |  Cumulus. |
| Cumulonimbus | Thunderstorm clouds. |  Cumulonimbus. |
Precipitation
As droplets or ice particles grow, they become too heavy to remain suspended and fall as precipitation. Depending on temperatures through the atmosphere, this reaches the ground as rain, snow or other forms. Thunderstorms may produce hail.
Lightning and thunder
Interactions between water droplets and ice particles in a thundercloud separate electrical charges. A sudden discharge produces lightning and thunder.
Temperature
The sun is the main source of heat. Sunlight warms the ground, which warms the air; heat also radiates back towards space. Clouds often reduce daytime heating by reflecting sunlight and limit cooling at night by retaining heat.
Wind affects how cold you feel: stronger wind increases heat loss. This is the windchill effect. On cold days, dress for the temperature you feel.
Forecasts and observations
A forecast helps you plan over the coming days, but uncertainty grows with time. Local signs can provide extra clues. Weather can be highly variable and local, particularly in the mountains. The following traditional signs are indications, not dependable forecasts.
| Possible signs of fair weather | Possible signs of poor weather |
|---|---|
| Calm conditions or wind from the north-east/east | Wind from the south through to the north-west |
| Rising air pressure | Falling air pressure |
| Short aircraft condensation trails in dry air | Long-lasting condensation trails |
| Lifting mist, steaming woods or fields, morning dew | High cloud |
| A red evening sky | A red morning sky or grey evening |
| Clear, cold nights | Warm, overcast conditions |
| Swallows and insects flying high | Swallows and insects flying low |
Thunderstorm safety
Count the seconds between lightning and thunder: about three seconds corresponds to one kilometre. If caught in a thunderstorm, seek proper shelter promptly. Avoid isolated trees, open high ground and water; leave the water immediately. Keep away from metal fences and other conductors. A substantial enclosed building or hard-topped vehicle is safer than an open-sided shelter. If no proper shelter is available, the crouched position shown may reduce exposure, but there is no safe place outdoors in a thunderstorm.
 Emergency crouched position if proper lightning shelter cannot be reached.
Astronomy
There is plenty to discover outdoors after dark too: planets, stars and galaxies.
Our solar system
The solar system consists of the sun, eight planets and their moons, dwarf planets, and smaller objects such as asteroids and comets. The sun's gravity keeps them in orbit.
The sun is itself a star. Nuclear fusion inside stars releases enormous amounts of light, heat and other radiation. The sun and countless other stars form our galaxy, the Milky Way. There are many other galaxies beyond it.
The planets
Planets are large celestial bodies visible because they reflect sunlight. The four inner rocky planets are Mercury, Venus, Earth and Mars. The outer planets are Jupiter, Saturn, Uranus and Neptune; Jupiter and Saturn are gas giants, while Uranus and Neptune are ice giants. Remember their order with:
My Very Eager Mother Just Served Us Noodles.
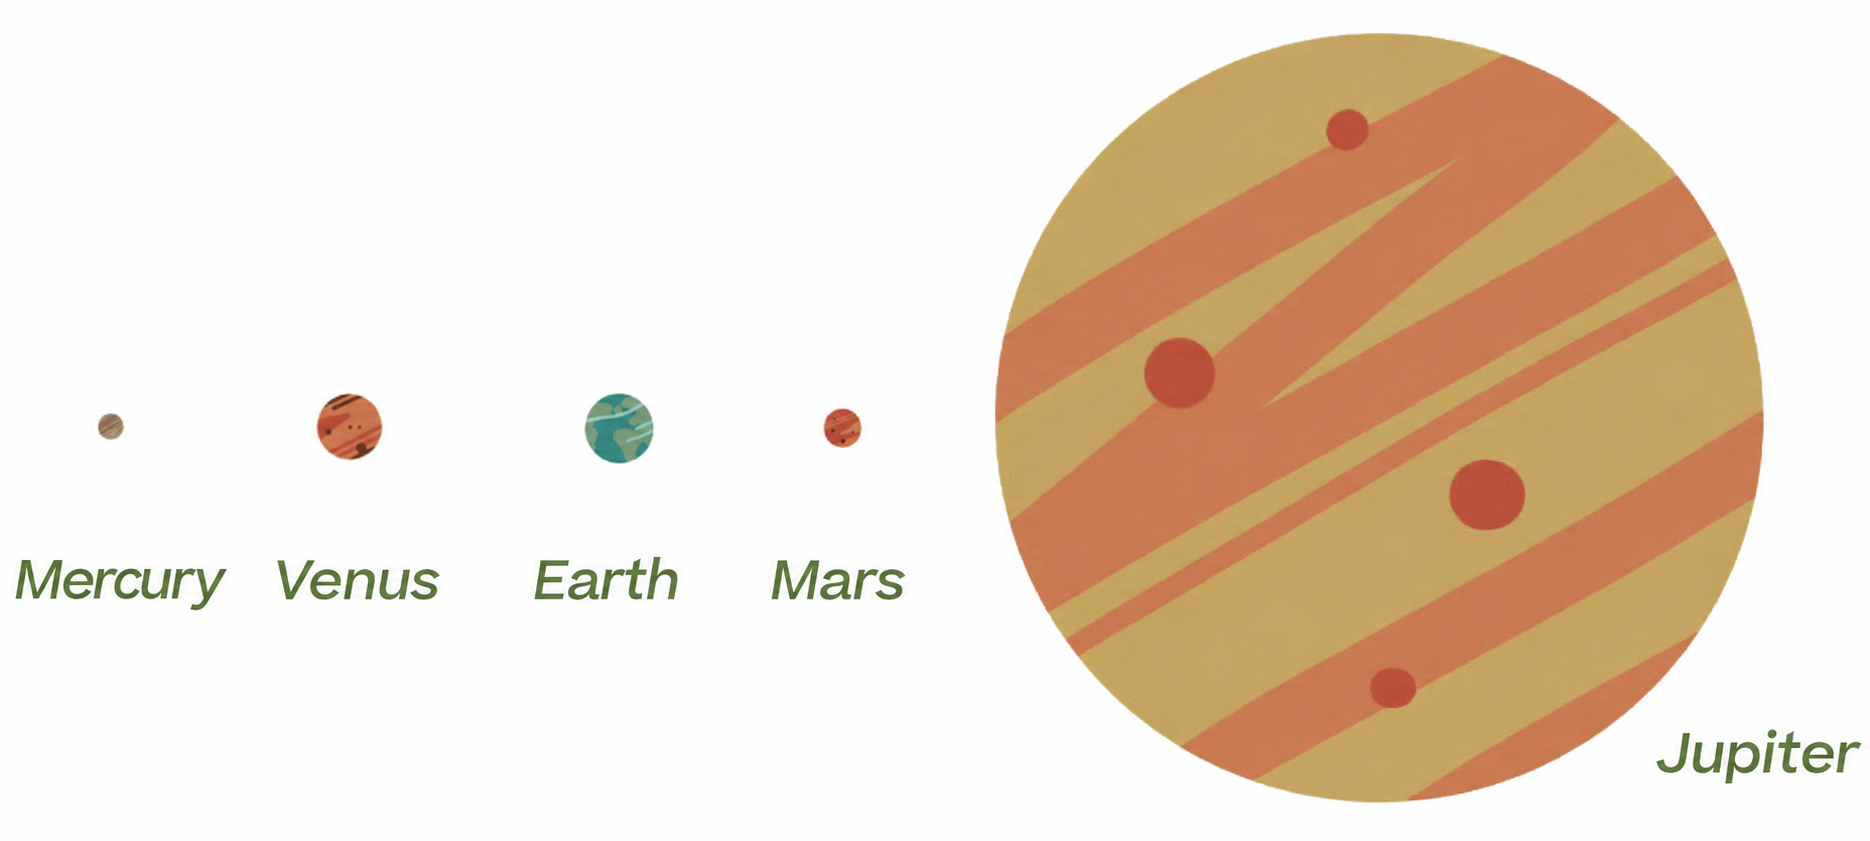 The planets, sheet 1.
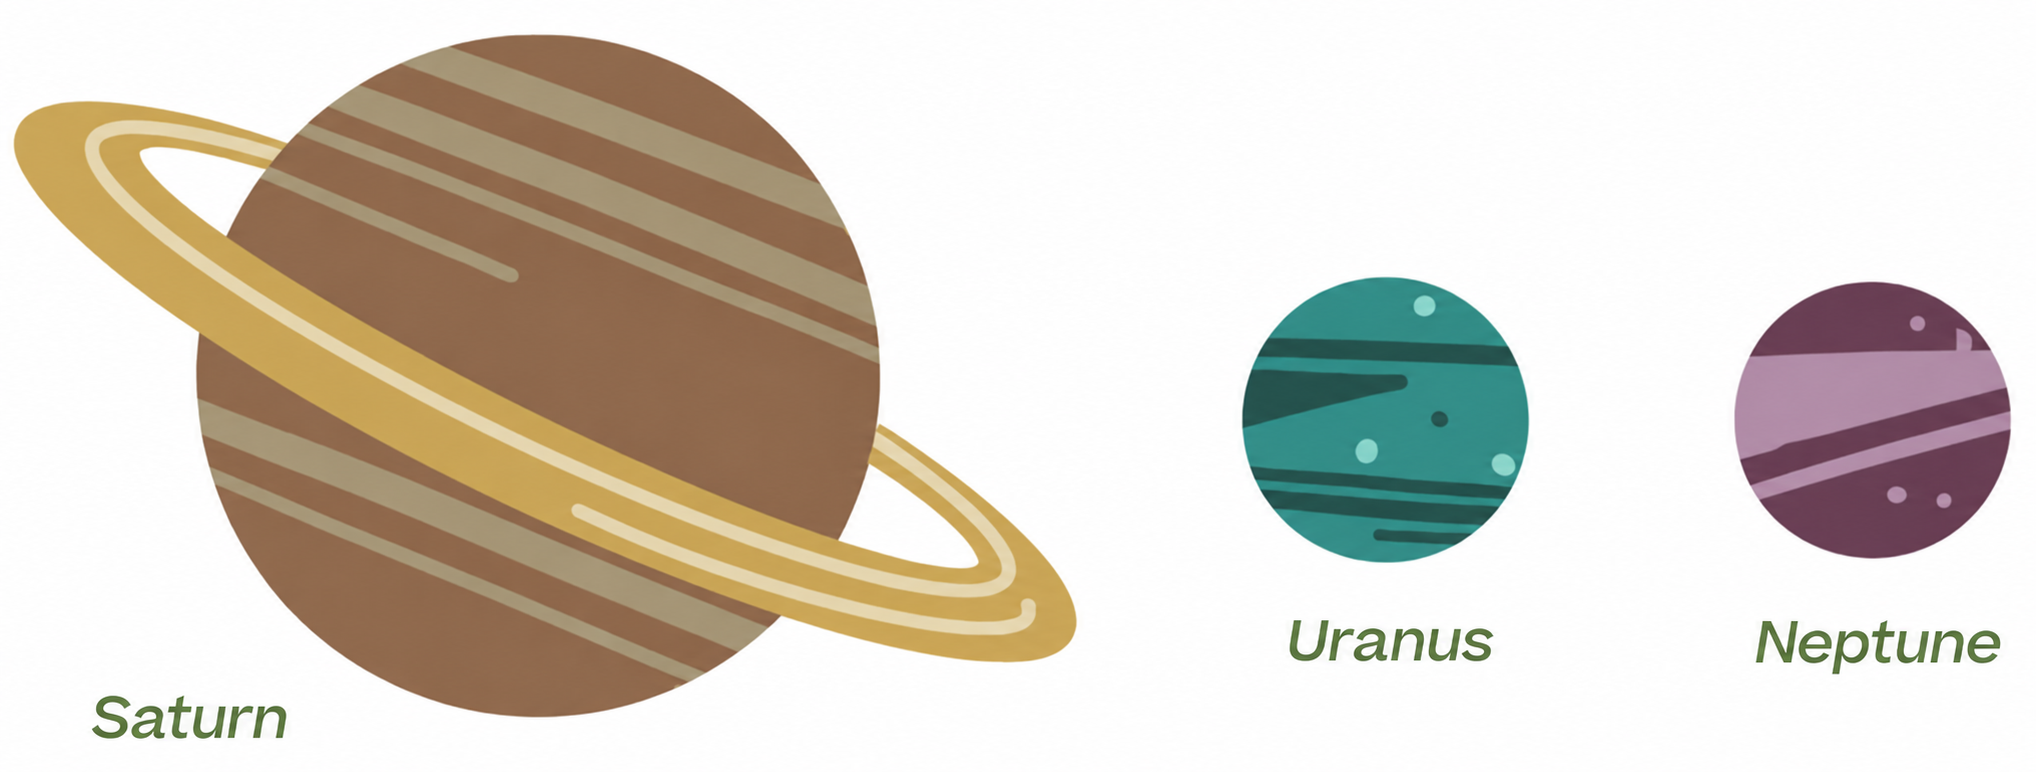 The planets, sheet 2.
Mercury, Venus, Mars, Jupiter and Saturn can be seen with the naked eye. Mercury and Venus appear near the sun in the morning or evening sky. Venus is the brightest object after the sun and moon, and is often called the morning or evening star. Mars appears reddish. Resolving Saturn's rings generally requires a small telescope rather than ordinary handheld binoculars. Visibility depends on each planet's position in its orbit.
The moon
Alongside the sun, the moon has a major influence on Earth. Its gravity contributes to the tides. Like the planets, it is visible through reflected sunlight. When the whole Earth-facing side appears illuminated, it is a full moon; when the illuminated side faces away, it is a new moon. Between new and full it is waxing, and between full and new it is waning.
 Phases of the moon.
The solar system also shapes our measures of time. A day corresponds to one rotation of Earth, a month approximately to the moon's cycle around Earth, and a year to Earth's orbit around the sun.
Stars and constellations
The Milky Way contains many stars; we see the brightest in the night sky. Their great distance makes them appear as tiny, almost fixed points, which people have long used for navigation. Recognisable patterns have names and are called constellations or asterisms. The Pole Star is a particularly useful guide in the northern hemisphere. It lies close to the direction of Earth's north rotational axis, so it indicates north.
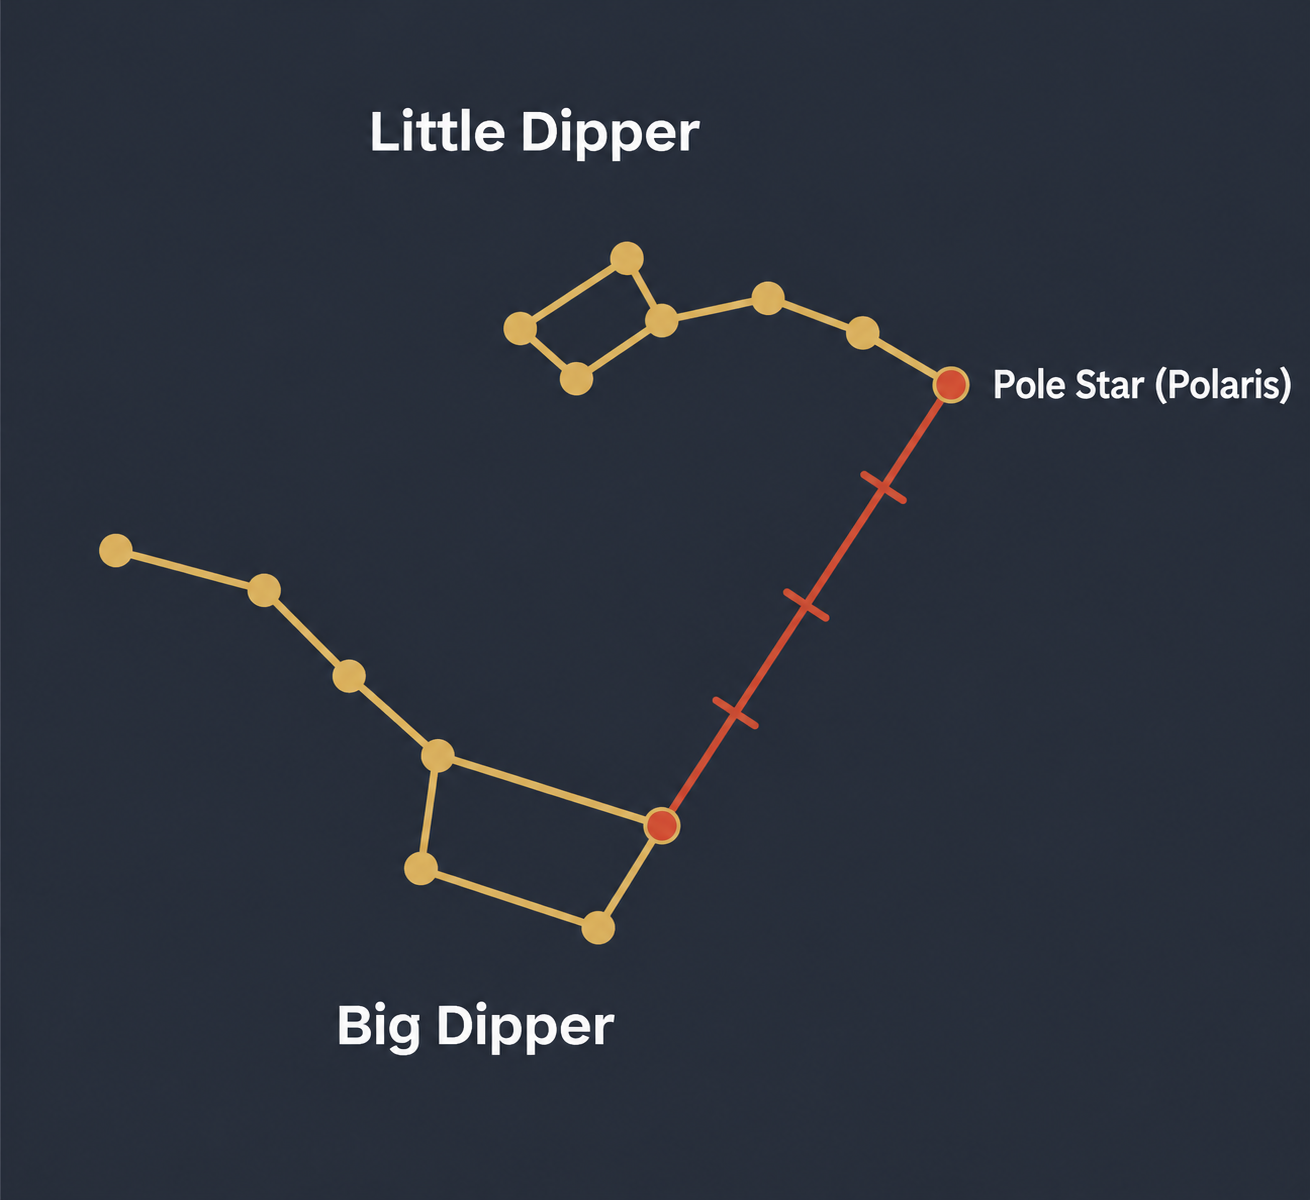 Finding the Pole Star.
Star charts
Star charts show the main constellations. As Earth rotates and travels around the sun, the view changes through the night and year. Different constellations are therefore visible in different months.
Summer star chart
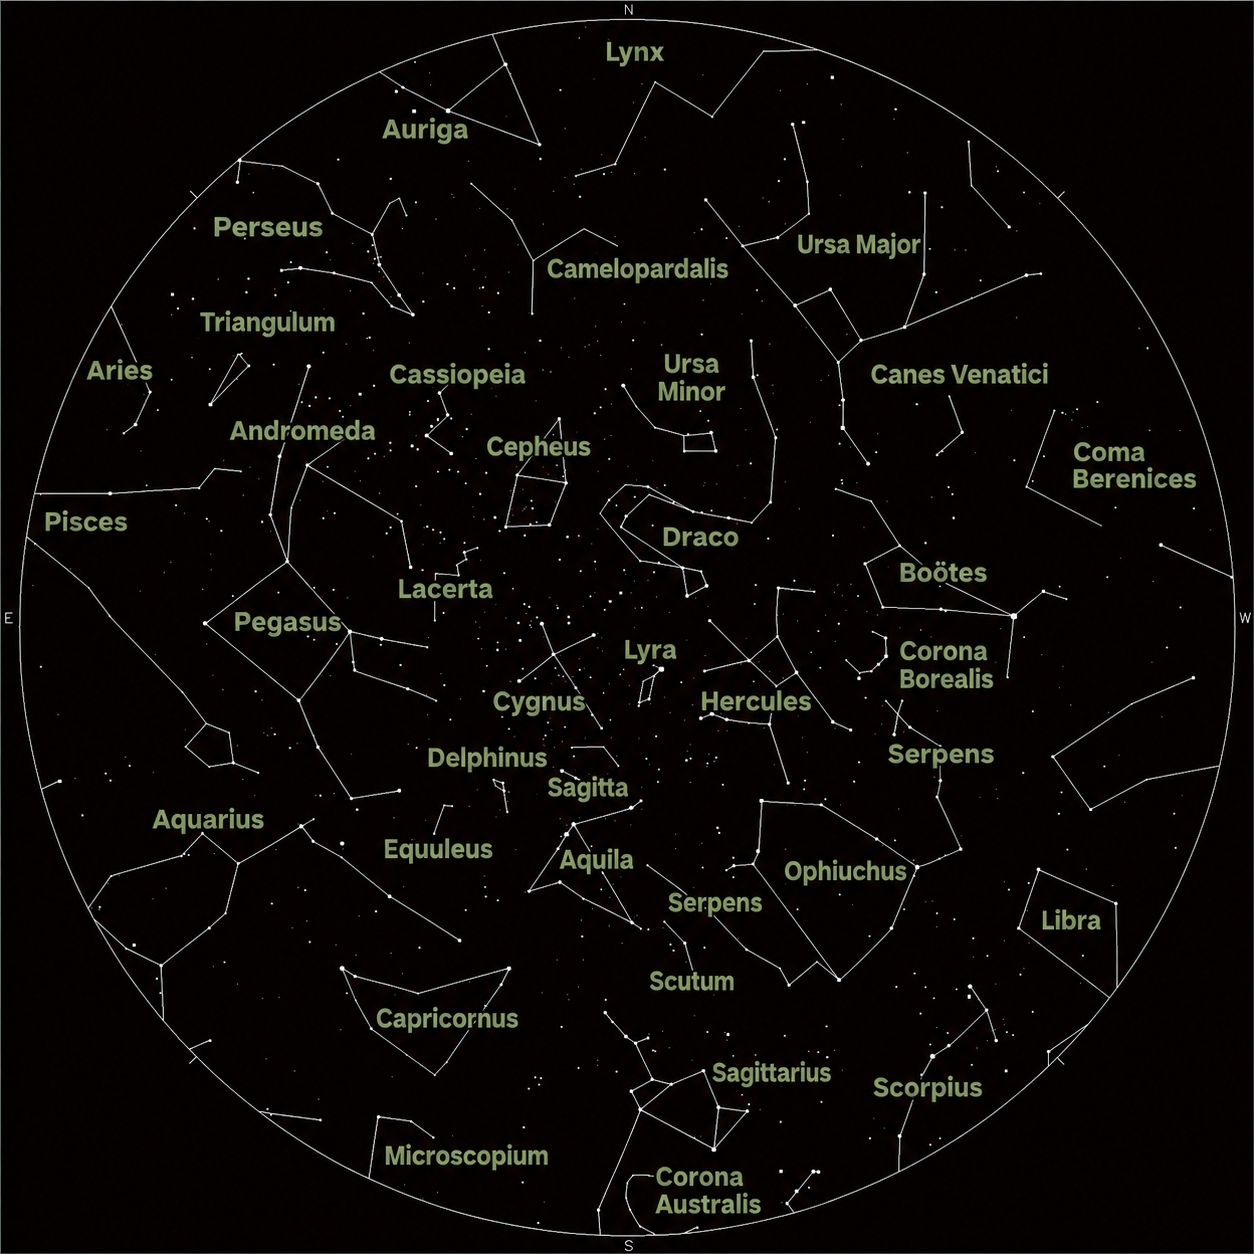 Summer star chart for the northern hemisphere.
Winter star chart
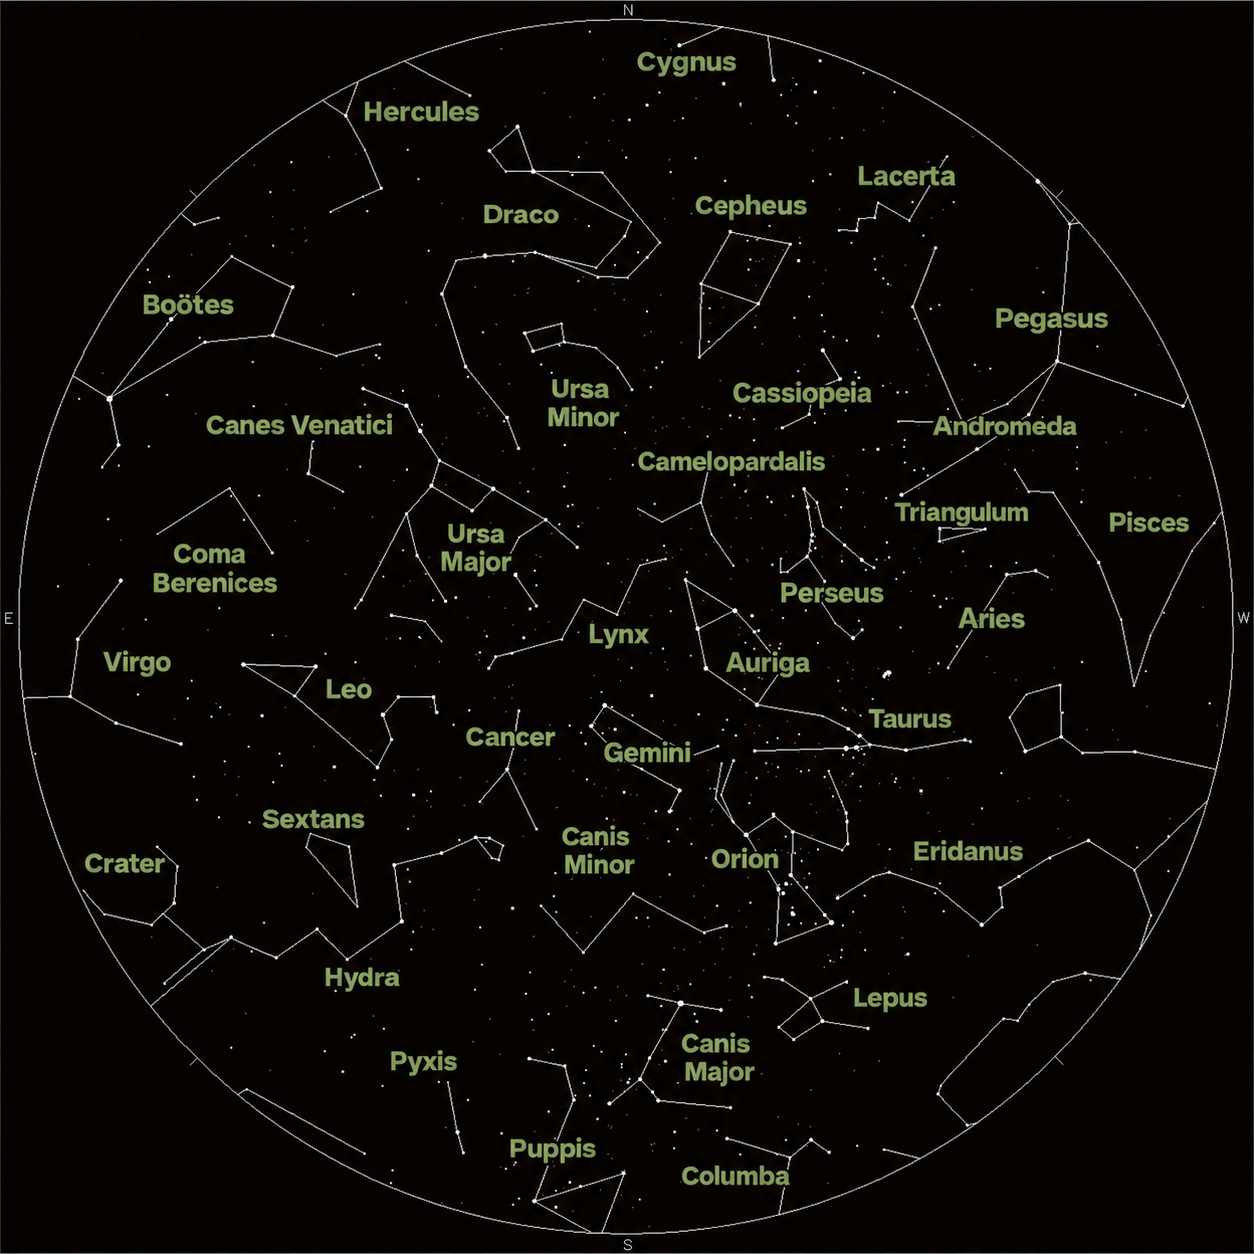 Winter star chart for the northern hemisphere.