Ropework and Camp Construction

Ropework and camp construction are Scout and Guide specialities. At camp, we build almost everything ourselves with ropes, tent sheets and natural materials. Building safely requires the right knowledge, including how to handle the materials and use the basic techniques.
The Basics
Almost every Scout and Guide camp has camp structures and larger constructions. Depending on your experience, skills and equipment, you can build anything from a simple kitchen shelter to a complex camp tower. Trying things out is the best way to learn. Start small and gain experience before tackling larger projects. If your unit lacks the necessary knowledge, your cantonal association offers opportunities to develop your outdoor skills.
Preparation
Planning begins when you visit the campsite. The size and character of the site, the terrain and the soil determine what you can build.
These questions will help you assess the site:
- What is the terrain like? Is it mainly flat or sloping? Where could each structure go, and is there enough room?
- Which direction does the weather come from? Are there sheltering rows of trees? Could any trees fall?
- What is the ground like? Is it very stony or sandy? Will it become muddy in rain? Can you dig deep enough for stable structures?
- Are there watercourses nearby? What happens during heavy rain? Could pools or streams form on the campsite?
- Is there scope for a group to plan and build structures independently?
Planning
Once you know the site, plan your structures.
- Which are essential? Which would be useful additions? In what order will they be needed?
- Do we have sketches or plans to help us?
- What materials do we need? What tools are available?
- What skills and experience does our group have?
- How many people can help with construction and dismantling?
- How much time do we have?
Building and dismantling
Important safety points when working with a group:
- Always wear safety footwear or walking boots.
- Allocate tasks according to people's abilities.
- Keep your back straight when lifting heavy loads to help prevent injury.
- Ask an extra person to help carry something rather than lifting a heavy object alone.
- Brace structures so they cannot tip or twist.
- Allow enough clear space around a structure for its full fall radius.
- Fit sturdy guardrails to high platforms.
- Use only materials in good condition.
- Take care: avoid fooling around, take enough breaks, protect yourself from the sun and drink enough.
- Use fall protection when working at height.
Structures where people's safety is at stake
Safety always comes first. All structures and rope constructions must meet appropriate safety requirements to reduce injury risks. A structure is safety-critical if people could be injured while on or inside it. People with the necessary knowledge and experience must therefore be involved. If your group lacks the equipment or expertise, get support or, if in doubt, do not build it. A safety plan is essential when planning and building safety-critical structures.
 Examples of structures where people's safety is at stake.
Equipment and Materials
Camp construction uses many different materials, some of them expensive. Use them correctly, look after them and store them properly so they can be used sustainably for years.
Tools
The right tools make many camp-building tasks possible and easier. They include axes, hatchets, shovels, pickaxes, hammers, sledgehammers, rubber mallets and saws.
Tips and rules for using tools:
- Use each tool only for its intended purpose: axes and hatchets for chopping wood, hammers for nails and rubber mallets for tent pegs.
- Only use tools in good condition.
- Check that tool heads are firmly attached to their handles.
- Hold tools correctly, using both hands where required.
- Clean tools after use and return them to the equipment tent.
- Use nails sparingly and dispose of them as scrap metal. Nails left behind harm the environment and can injure animals.
- Do not strike the ground with bladed tools.
- Wear gloves and closed footwear.
- Protect yourself and your fellow Scouts and Guides: leave enough room around you when swinging a tool.
- After camp, protect tools from rust with a little oil.
Wood
Wood is an important building material. Although renewable, it should be used thoughtfully.
- Large, heavy pieces such as round poles, squared timber and formwork panels can be reused if handled properly.
- Choose timber with a diameter suitable for its purpose.
- Use lashings instead of nails and screws to protect the wood.
- While planning, consider whether you can return, sell or store the wood for another camp.
- Choose local wood when buying or hiring it.
- Ask the forester whether you may use wood from the forest and for what purpose.
Ropes
Ropes can be tied into many knots and connections, making them versatile. They do not damage the construction materials and can be untied and reused.
Types of rope
Ropes come in different materials and lengths. Similar-looking ropes may have different purposes, so choose the right type for each use. Colour alone does not identify a rope's type.
| Type | Natural-fibre rope | Low-stretch rope | Polypropylene rope |
|---|---|---|---|
 Natural-fibre rope. |
 Low-stretch rope. |
 Polypropylene rope. |
|
| Construction | Twisted, without a kernmantle structure | Braided, with core and sheath | Twisted or braided, with core and sheath |
| Material | For example, hemp fibres | Polyamide/nylon | Polypropylene |
| Use | General rope construction; not suitable for safety-critical activities | Safety-critical activities: abseiling, aerial ropeways and rope bridges | Camp structures, ropework and guy lines |
| Stretch | Low, not standardised | Moderate, below 5% | Low, not standardised |
| Properties | Heat-resistant; absorbs much water; contracts when wet | Very sensitive to heat; sensitive to chemicals, sharp edges and particles such as sand; absorbs little water; does not rot | Heat-sensitive; does not absorb water |
Only tested ropes suitable for the purpose may be used to protect people. Follow the manufacturer's retirement criteria and retire ropes no later than ten years after manufacture, or sooner when required. Retired ropes may only be reused for suitable construction work if their condition permits. Mark retired ropes clearly and store them separately from ropes used for personal protection.
Other types, such as wire and steel ropes, have very specific requirements and are not recommended for Scout and Guide camps. Dynamic ropes are used for climbing and mountaineering; their high stretch makes them unsuitable for camp structures.
Rope strength
Age and knots can substantially reduce rope strength; reductions of 50–75% are possible. Do not tension a rope system with more than two or three people, as overloading can damage the rope and reduce its strength.
Looking after ropes
- Protect ropes from moisture and dirt.
- Dry wet ropes as soon as possible.
- Untie all knots after use.
- Protect ropes from mechanical damage.
- Do not tread on ropes.
- Temporarily bind fraying ends or use heat-shrink tubing.
 Securing a fraying rope end.
- Store ropes in a cool, dry place away from sunlight.
- Inspect each rope before every use.
- Use protection where ropes are attached to trees. This protects both the rope and the tree.
- Mark rope lengths with a suitable colour code, for example using heat-shrink tubing or manufacturer-approved markings.
Stop using a rope in these cases:
- You can feel damage to the core of a kernmantle rope.
- The sheath is badly damaged and the core is visible.
- The rope has come into contact with chemicals.
- The rope has cuts or tears.
Coiling ropes
Store ropes neatly coiled to keep them in good condition. Put them in boxes or hang them up.
 Coiling a short rope.
You can gather and coil ropes as follows:
 Coiling a long rope.
Tent sheets
Tent sheets can be used for games, rain protection, collecting materials, padding and construction. They are versatile but expensive, so think carefully about how you use them.
Tent sheets vary in colour, design, material and size. Compatible Swiss army tent sheets can generally be joined together. Main characteristics of a standard sheet:
- Length and width: 1.65 m
- Dry weight: 1.25 kg
- Wet weight: 2.5 kg
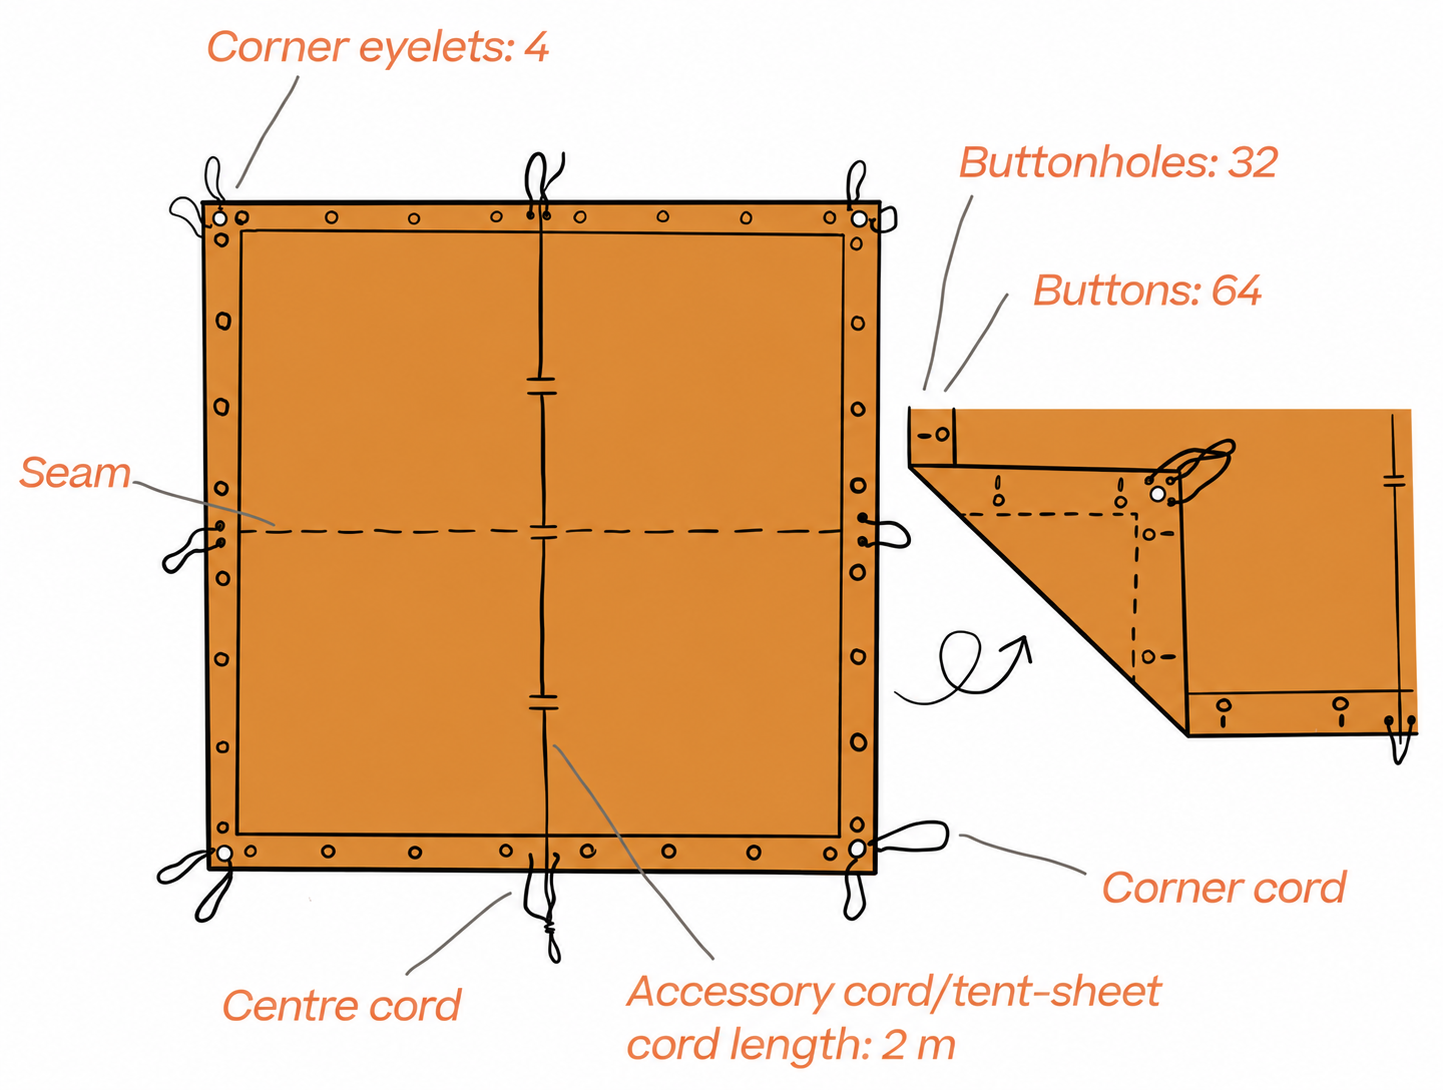 Parts of a Swiss army tent sheet.
Looking after tent sheets
Use newer sheets in good condition for living and sleeping shelters. Their waterproofing keeps out rain. Older or rejected sheets can be used where wear is greater: for toilets and showers where they get wet, kitchen shelters exposed to sparks, or camp games where they get dirty.
Prevent damage by following these rules:
- Never tread on tent sheets, particularly over rough ground such as branches or stones.
- Tension sheets using the corner cords rather than the eyelets to spread the load more evenly.
- Do not wash them with soap, which removes the waterproofing.
- Instead, let dirty sheets dry and then brush off the dirt.
- Put away sheets you no longer need.
For protection, pack and store tent sheets in bundles of ten. They must be clean and dry, with the waterproofed side facing outwards.
 A bundle of ten tent sheets.
Tent kits
Together with tent sheets, tent kits let you build many types of shelter. A kit contains a bag, three pegs and three pole sections, each 40.5 cm long, which assemble into a pole approximately 1.1 m long.
 Contents of a tent kit.
Looking after tent poles
- Clean off dirt and soil after use.
- Make sure every part of the kit is clean and dry before packing.
- Never hammer pole sections into the ground. The soft aluminium bends, and the sections may no longer fit together.
- Attach empty kit bags to guy lines or store them in the equipment tent.
Knots and Lashings
Knots are a foundation of Scout and Guide skills and essential for camp construction. They join and secure cords and ropes, with uses ranging from decorative neckerchief knots to practical connections.
Knots
Reef knot
The reef knot is flat, so it is often used for securing bandages. Do not use it to join ropes: it can come undone under heavy load.
 Reef knot.
Bottle sling knot
Known locally as the Päckli, magic or bottle knot, this knot is used for tying bundles of newspapers or making rope ladders.
 Bottle sling knot.
Fisherman's knot
The fisherman's knot joins two ropes of equal or different diameters.
 Fisherman's knot.
Sheet bend
The sheet bend joins ropes of different thicknesses. Make the loop, or bight, in the thicker rope and tie the thinner rope through it.
 Sheet bend.
Half hitches
Half hitches attach a rope to a narrow object such as a ring, branch or eyelet. They also secure tensioned rope ends in camp construction. Several hitches are usually tied to finish off the rope.
 Half hitches.
Fuhrmann tensioning loop
The Fuhrmann knot is often used in rope-tensioning systems. It is made from a bottle sling knot with extra twists. Decide which end you will pull before tying it.
 Fuhrmann tensioning loop.
Clove hitch
The clove hitch is mainly used to attach the middle of a rope. It holds under an angled pull or a pull on one end, but may be difficult to undo. It can be formed in loops and slipped over an object, or tied around it.
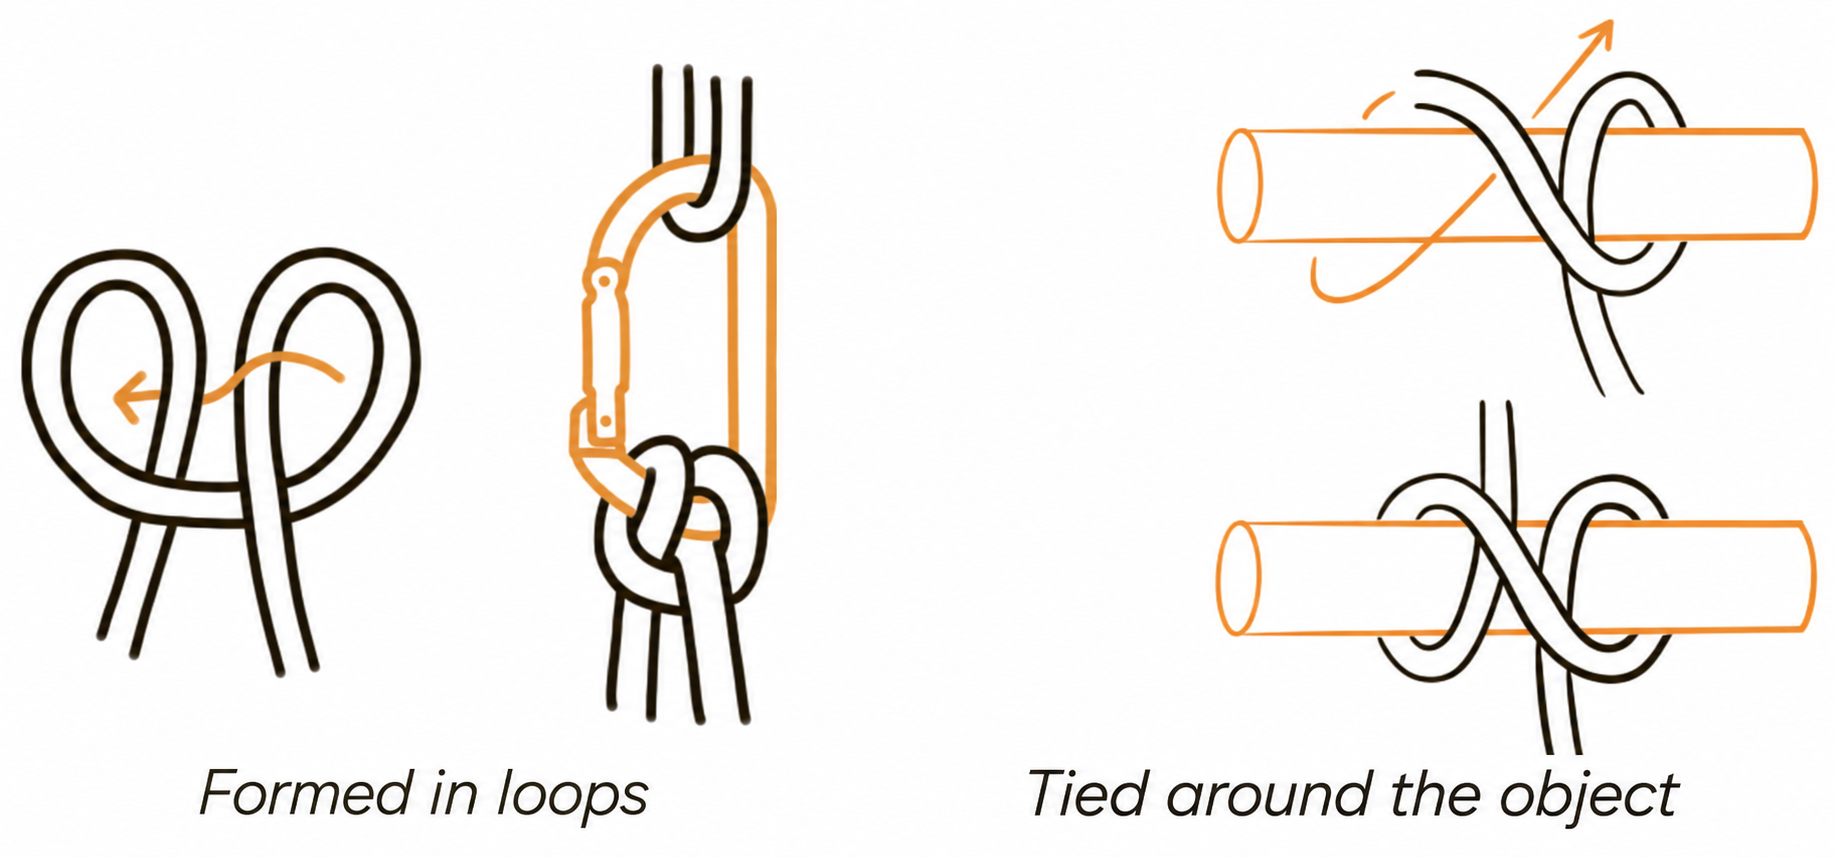 Clove hitch, formed in loops or tied around an object.
Figure-of-eight knot
This knot thickens the rope end to prevent it slipping through an opening. It has many uses, including backing up a timber hitch.
 Figure-of-eight stopper knot.
Figure-of-eight loop and bend
A figure-of-eight tied on a doubled rope makes a loop that can be untied again. A rethreaded figure-of-eight can also join two ropes as an alternative to a fisherman's knot.
 Figure-of-eight loop and rethreaded connection.
Cow hitch
A cow hitch attaches a loop to an object. Both strands must be equally loaded. It can slip sideways.
 Cow hitch.
Prusik knot
Adding another wrap to a cow hitch gives a Prusik knot. It attaches a thinner cord to a main rope and grips under load.
 Prusik knot.
Timber hitch
The timber hitch is easy to tie and quick to release. Tie it at the rope end; it holds only under a steady load. Use it around thick objects and make at least seven turns as shown. It is suitable for general camp construction, but not safety-critical structures.
 Timber hitch.
Tensioning hitch
This hitch secures loads and tensions ropes or guy lines on structures. Its central part is a bottle sling knot. Pass the rope around the fixed object and pull it through the knot's loop to tension it. Finish with half hitches to stop it loosening. To make dismantling easier, insert a stick through the bottle sling knot or replace it with a Fuhrmann loop. A carabiner between the loops reduces rope friction.
 Tensioning hitch.
Bowline
A bowline quickly makes a fixed loop. Because it does not tighten around the object, it is easy to undo. It can, however, come undone under alternating loading and unloading.
 Bowline.
Neckerchief knot
This decorative knot is tied in a neckerchief. In some groups, it is traditional to ask a close Scout or Guide friend to tie it for you.
 Decorative neckerchief knot.
Lashings
Lashings join squared timber, poles and logs. Make each one carefully and tighten every turn.
Square lashing
A square lashing joins two pieces of timber at right angles. Start with a clove hitch on the upright below the joint and take at least five turns around both pieces. Finish with three tight frapping turns around the lashing and secure with a reef knot.
 Square lashing.
Diagonal lashing
A diagonal lashing is wrapped across the joint rather than around it. It is less secure than the square lashing shown here, but the poles do not have to meet at right angles.
 Diagonal lashing.
Round lashing
A round lashing joins two parallel pieces of timber, extending or reinforcing them. For a secure joint, use two lashings as far apart as possible. It can also secure a coiled rope or, with a few turns, attach a rope to a tent-sheet corner.
 Round lashing.
Oblique round lashing
This lashing joins two poles at any angle. Begin with a clove hitch in the middle and work outwards on both sides. Finish with three tight frapping turns and a reef knot.
 Oblique round lashing.
Tripod lashing
A tripod lashing joins three poles. Spreading and twisting them into position creates a stable tripod.
 Tripod lashing.
Rope Constructions
Rope constructions affecting people's safety must be built with equipment in perfect condition, by people with the necessary experience and care. These include large, heavy structures, rope bridges and aerial ropeways, as well as systems for lowering people or equipment.
Building and operating them requires appropriate care: rope failure and falls can cause serious injury or death. If you lack the necessary skills, involve someone with the right experience.
Using safety-critical rope constructions
In addition to the rope-care rules already described:
- Always use equipment that is inspected, suitable for its purpose and in good condition.
- Never run a rope directly through a webbing or rope sling; use a carabiner.
- For an aerial ropeway, use only Triact-Lock carabiners that cannot open by themselves.
 Triact-Lock carabiner.
- Use only approved tandem pulleys for an aerial ropeway.
- Build complex systems with redundancy: a second, independent safeguard.
- Use the best rope for the safety system.
- Never stand beneath a structure under construction.
- Do not hang from the ropes.
The illustrations below are intended as inspiration and show what ropework makes possible. When building these systems, follow the official J+S “Seiltechnik” guidance.
Rope bridge
 J+S rope-bridge illustration.
Aerial ropeway
 J+S aerial-ropeway illustration.
Abseiling
 J+S abseiling illustration.
Camp Structures
For many units, building camp structures is a highlight of camp. Most constructions share the same basic steps. Once you master them, you have the skills to tackle many different projects.
Digging holes
Before digging a hole or trench, lift the turf: the layer of grass, soil and roots. Store it grass-side down in the shade. You can protect it in hessian sacks or sheeting. Keep it from drying out and replace it in the same place at the end of camp. This protects the ground and the natural environment.
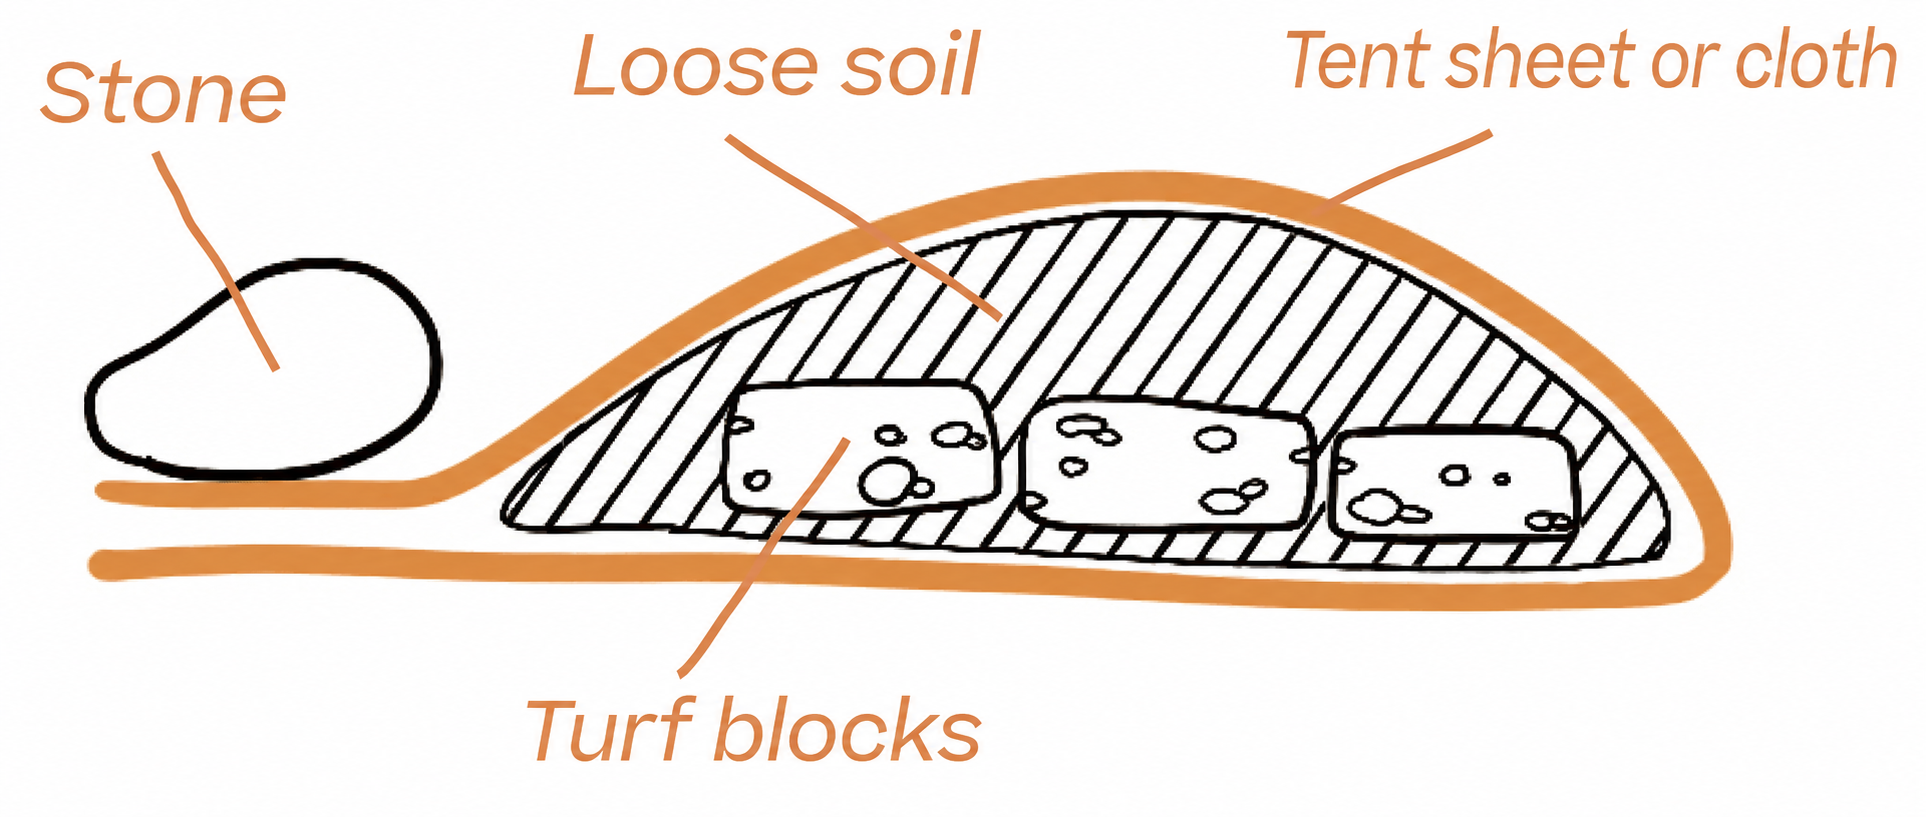 Lifting and storing turf.
Protection from the weather
Pitch a tent with its entrance facing away from the prevailing wind. Avoid hollows where heavy rain can collect. You can lift strips of turf along the tent edge to form drainage channels, but protect the soil and dig only as much as necessary.
Guying
Drive pegs into the ground at right angles to the taut guy line so they resist being pulled out. When attaching a guy line to a tent pole, place it between the overlapping tent sheets to prevent it slipping up or down. Mark taut lines clearly so nobody trips over them, for example with coloured cord or marker tape.
 Positioning pegs and guy lines.
Camp structures
Put up the essentials first:
- Kitchen and washing-up area
- Latrine and washing area
- Communal shelters or a Sarasani
Their design depends on your experience, skills, needs, opportunities and creativity. Consider whether you can adapt them to the camp theme.
Other ideas include:
- Raised platforms for sleeping tents
- Towers
- A garden swing seat
- A sauna
- A flagpole
- A recycling station
- A swing
 A camp swing.
Building with tent sheets
Tent sheets can form shelters of many shapes and sizes. A few principles make them stable and weather-resistant.
Joining tent sheets
Always fasten both rows of buttons. Otherwise neighbouring buttons carry too much load and may tear out. Overlap the sheets like roof tiles so rain runs off rather than into the tent. Consider the prevailing weather so wind cannot blow through the joins. Arrange the central seams so they do not trap runoff. Sheets pitched too flat collect pools of rainwater. Before fastening them, work out where each sheet will sit in the finished shelter.
 Joining tent sheets with the correct overlap.
Tent-sheet shelters
Here are some simple, tried-and-tested designs. With practice and experience, you can experiment with new combinations.
Sarg shelter
The Sarg (“coffin”) shelter is small and not waterproof, but protects well against wind. A spare pole section is sometimes used as a fourth peg; take care not to bend it.
- Equipment: 1 tent sheet, 2 pole sections, 4 pegs
- Sleeps: 1 person
 Sarg shelter.
Sleeping-bag shelter
This design suits fine weather and provides an outer cover for sleeping bags, with an open view of the stars. It is unsuitable for rain: water collects on the top sheet, and contact between the sheet and a sleeping bag lets moisture through.
- Equipment: 3 tent sheets, 4 pole sections, 4 pegs
- Sleeps: 2–3 people
 Sleeping-bag shelter.
Pyramid tent / tipi
The pyramid tent is easy to pitch and gives good wind protection, but cannot be completely closed. A larger version uses 12 tent sheets. Do not use assembled tent-pole sections as its central support: they are not strong enough. Use a straight, sufficiently strong branch or pole of the right length.
- Small version: 3 tent sheets, 3 pole sections, 5 pegs
- Large version: 12 tent sheets, a 2.2 m pole, 10 pegs
- Sleeps, small: 2 people
- Sleeps, large: 8 people
 Pyramid tent.
Ridge tent
A ridge tent protects well against rain and can be extended to any length. It suits a group bivouac because each sleeping place requires one tent sheet and one tent kit. Make an entrance wherever you like by leaving a sheet open and supporting it with poles and guy lines. Extra sheets can close the open ends.
- Equipment: 2 tent sheets, 6 pole sections, 6 pegs
- Sleeps: 2–3 people
 Ridge tent.
Gotthard tunnel
The Gotthard tunnel uses one more sheet than a ridge tent but withstands wind better. Its ground sheets also help keep it warmer. Sheets or luggage across the side openings give additional weather protection, although heavy rain can still pool on the fabric. The design can be extended, but is narrower, making very long versions hard to enter. Individual foot ends can be opened for ventilation.
- Equipment: 3 tent sheets, 6 pole sections, 6 pegs
- Sleeps: 2–3 people
 Gotthard tunnel shelter.
Berliner
Pitching a Berliner is demanding and requires good teamwork. It is fully enclosed, weatherproof and retains warmth, but is cramped and difficult to enter. It is especially suitable for a one-night bivouac.
- Equipment: 8 tent sheets, 11 pole sections, 12 pegs
- Sleeps: 4 people
 Berliner shelter.
Large Berliner
In this version, four sheets replace each sheet of the smaller design, providing overnight shelter for a larger group.
- Equipment: 32 tent sheets, 16 pole sections, a 2 m pole
- Sleeps: 20 people
Larger camp shelters
Large ridge tent
A large ridge tent is technically demanding, but offers plenty of room and good protection from sun and rain. Supports can be guyed masts, pairs of poles, tripods, a sturdy tower or a suitable tree. Its large surface catches the wind, so design it so the sheets can be lowered and weighted down quickly in strong winds. Use ropes to guy the lower edges and spread the load on the sheets. Pulleys on the supports help raise the assembled roof.
- Equipment: 28–40 tent sheets, 2 sturdy supports, 2 pulleys, enough ropes, storm pegs
 Large ridge tent.
Sarasani
The Sarasani is perhaps the best-known Swiss Scout and Guide shelter, used for eating and communal activities. First join the sheets into a large L, as illustrated, with a guyed mast at its inside corner. Join the inner edges of the L and raise the apex up the mast. To reduce strain on the sheets, wrap the top three around a sturdy triangular frame of wooden poles, which carries the lifting load.
In a storm or strong wind, release the outer edges, wrap the whole shelter around the mast and secure it with ropes or a tensioning strap.
- Equipment: 27 tent sheets, 1 support, storm pegs, 8 guy ropes, 1 pulley
 Sarasani shelter and sheet layout.